Operation
The following section mainly introduces the usage of Percipio Viewer:
Before Using Percipio Viewer, Please:
Download Percipio Viewer from https://en.percipio.xyz/downloadcenter/. After extracting the files, you will get
percipio-viewer.X.X.X.exe.Connect the Percipio camera to the host computer. For connection methods, please refer to Hardware Connection.
If you are using a USB camera for the first time, please complete the following operations:
Windows: Download and install the driver from https://en.percipio.xyz/downloadcenter/. For installation instructions, please refer to install USB driver.
Linux: Please refer to install USB driver and access permission to complete the relevant configurations.
Set Camera IP
Percipio Viewer supports configuring the IP address of a network camera to either a static or dynamic IP. Before setting the camera IP, ensure that the host computer’s IP is on the target subnet.
Follow these steps to set the camera IP:
Click on Preferences. In the drop-down menu, click on Device IP Settings. Enter Device IP Settings page.

In the Net interface list, select the network interface of the target subnet or choose All network interfaces.
In the Found device, select the target camera’s serial number.
Fill in the following details sequentially: Device mac address, Device target IP, Device target gate, Device target mask.
Note
Find the MAC address from the label on the camera body. The format should be:
xx:xx:xx:xx:xx:xx.Leaving the Device target IP field blank will set the current camera to use a dynamic IP address. Filling in this field will set the camera to use a static IP address.
Click Accept.
If the Log area displays “Device IP setting is successful,” it means the IP setting was successful. If the Log area displays “Device IP setting failed,” it indicates that the IP setting failed. Please check the computer’s network configuration, hardware connections, and the parameters entered on the Device IP Settings page.
Select a Camera
Percipio Viewer supports camera retrieval via Ethernet. Starting from version V1.2.3, Percipio Viewer does not automatically open the camera upon startup; you need to manually select and open it.
Using a camera with the serial number 207000106916 as an example, follow these steps to select a camera:
After the camera initialization is complete, click on Preferences. In the drop-down menu, click on Refresh Source to refresh the device list.
In the device list, select the target camera with the serial number 207000106916.
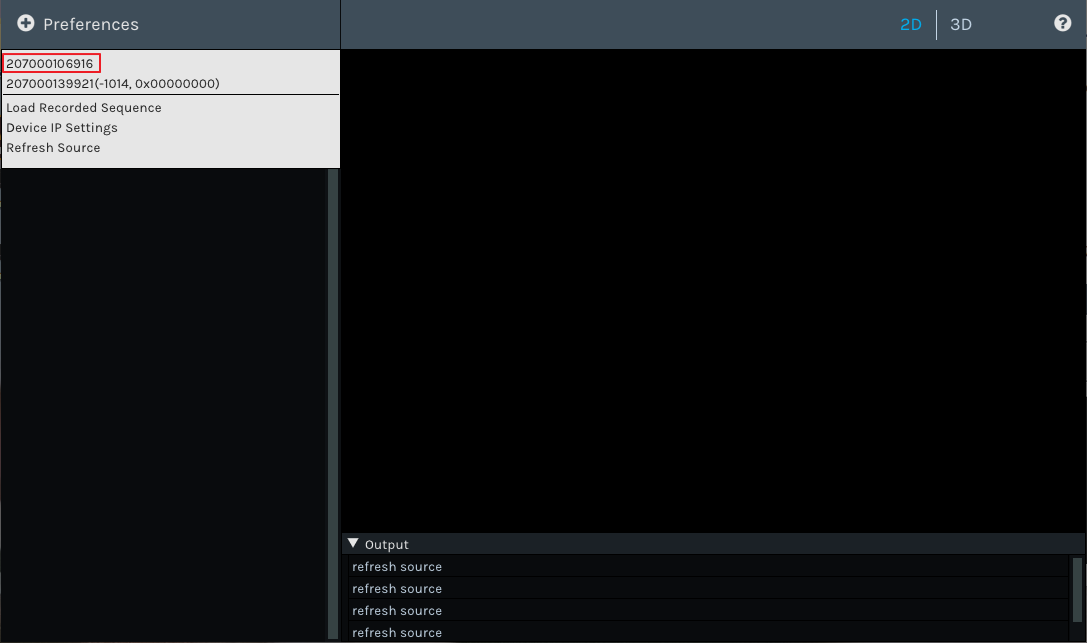
Note
If the serial number in the device list is followed by a camera status code and firmware error code (e.g., as shown in the image -1014, 0x00000000), it indicates that the camera cannot be opened normally. Please refer to the Error Codes to troubleshoot the issue.
View Information
Click
 to view information, including the Interface Name, Serial Number, Vendor, Model, MAC/IP Address (specific to network cameras), Firmware Version, and Configuration Version.
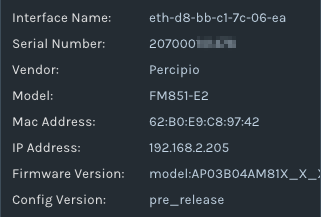
Network Camera Information
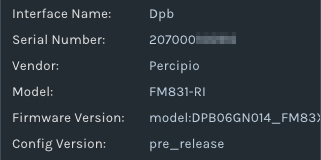
USB Camera Information
The firmware version information is relatively long. When you hover the mouse over the Firmware Version, the full content will be displayed.
You can use Ctrl+C + Ctrl+V to copy and paste the camera information.
Set Work Mode
Percipio Viewer supports setting the work mode of the camera, allowing the camera to capture images according to the settings.
When all data streams are ![]() , click
, click ![]() , and select the work mode according to the table below.
, and select the work mode according to the table below.
Work Modes |
Camera Working States |
|---|---|
Trigger Mode Off |
When the data stream is on, the camera continuously captures images at the highest frame rate. |
Hardware Trigger Mode |
Connect an external hardware trigger signal source to the camera. When the data stream is on, the camera captures images according to the trigger signal frequency. |
Software Trigger Mode (continue) |
When the data stream is on, the camera captures images upon receiving software trigger signals. |
Software Trigger Mode (single) |
When the data stream is on, click |
A checkmark icon √ will appear to the right of the selected work mode.
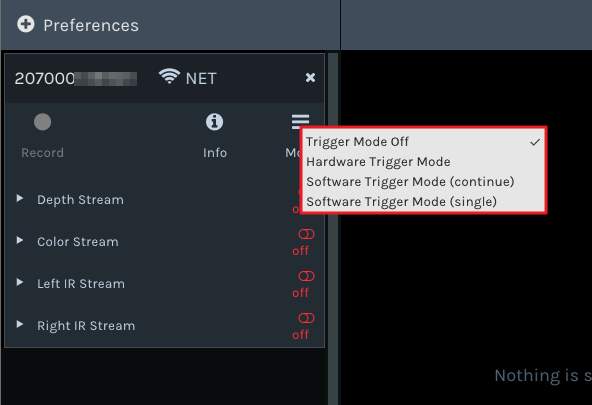
Selected Work Mode
View Image
Percipio Viewer supports previewing different images under various work modes, viewing image resolution, frame rate, latency, and adjusting the view.
Alignment Perspective
When both the Depth Stream and Color Stream are ![]() , click the following buttons to switch to RGB-Depth alignment and RGB-3D alignment views:
, click the following buttons to switch to RGB-Depth alignment and RGB-3D alignment views:
Click Registration to switch to the view where the color image is aligned with the depth map.
Click Color 3D to the view where the color image is aligned with the 3D point cloud image.

Color Image and Depth map Alignment

Color Image and 3D Point Cloud Alignment
Frame Rate
When the camera is operating in free acquisition mode (Trigger Mode Off) and the data stream is on, you can preview images in real-time. The image resolution and frame rate can be viewed in the title bar above the image.
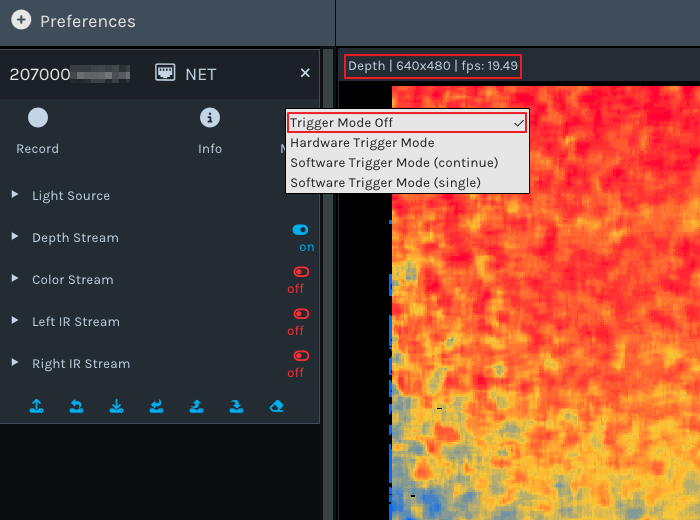
Preview Images in Free Acquisition Mode
Latency
When the camera is operating in continuous software trigger mode and the data stream is on, you can preview images in real-time. The image resolution, frame rate, and latency can be viewed in the title bar above the image.
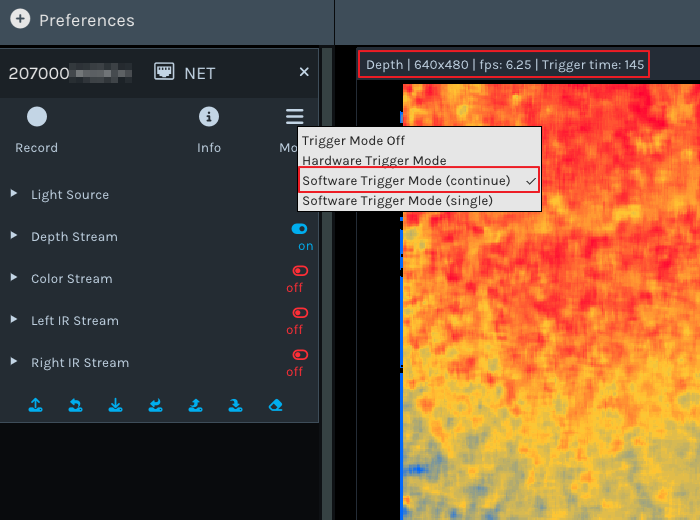
Preview Images in Continuous Software Trigger Mode
When the camera is operating in single frame software trigger mode and the data stream is on, you can preview images by clicking the
 button. The image resolution and latency can be viewed in the title bar above the image.
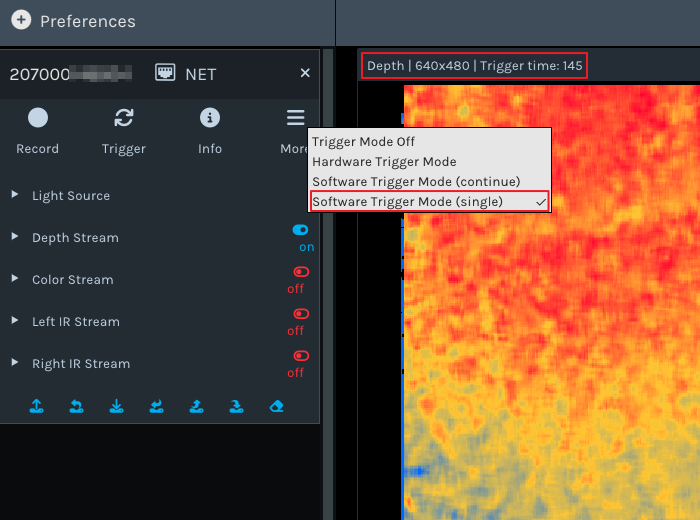
Preview Images in Single Frame Software Trigger Mode
Note
When the camera is operating in hardware trigger mode, the title bar above the image only displays the image resolution, without showing the frame rate and latency.
The unit of latency is milliseconds (ms).
Adjust View
You can switch views by clicking on the options in the view switch area: 2D, 3D, Registration and Color 3D.
Note
You can only switch to the Registration or Color 3D views when both the Depth Stream and Color Stream are turned on.
Place the mouse over the 2D/3D image and use the following methods to adjust the view:
Zoom the image: Scroll the mouse wheel.
Pan the image (supported only in 3D/Color 3D views): Hold down the mouse wheel and drag.
Rotate the image (supported only in 3D/Color 3D views): Hold down the left mouse button and drag.
Reset the view (supported only in 3D/Color 3D views): Click

Press the Space key on the keyboard to pause the image display, and a pause icon will appear in the image display area. Press the Space key again or switch the view, and the pause icon will disappear, resuming real-time image display.
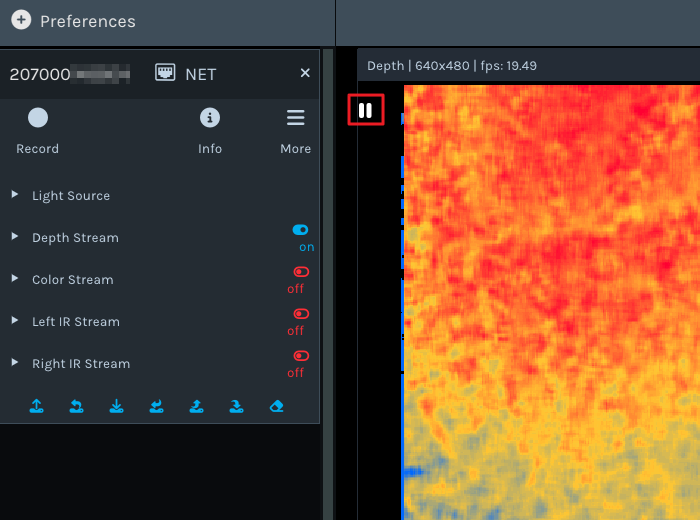
Pause the image display
You can use the following keyboard keys to adjust the 3D/Color 3D view: W, S, A, D.
Adjust Parameters
Percipio Viewer supports adjusting parameters for different components.
Click
 on the left side of the component to expand the page and adjust the parameters as needed.
If some parameters are grayed out when the data stream is
 , it indicates that these parameters can only be modified when all data streams are
  .
.Set Parameters:
Click
 on the right side of the parameter to input the set value.
Move the slider left or right to set the parameter value.
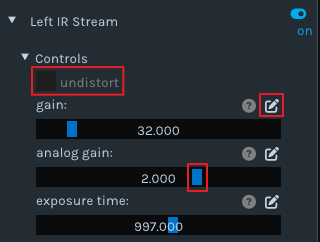
Set Parameters
Note
Different camera models support different parameters, and the components and features displayed in the Percipio Viewer interface will change accordingly. For adjustable parameters, refer to the Parameter Descriptions .
Save Image
Save Image Once
Follow these steps to save a 2D/3D image:
Note
The image files are saved to the C drive by default. If you are unable to save to the default path, please refer to What to do if you cannot save files to the C drive?
Switch to 2D View, and click on
 , select the save path and click Save.
Switch to 3D/Color 3D View, and click on
 , select the file format for exporting the 3D point cloud (supports
 .xyzand.plyformats) and the save path, then click Save.
Save Images Continuously
Percipio Viewer can continuously save images (depth maps, color images, left and right grayscale images, depth maps mapped to color images, color images mapped to depth maps, point cloud images, and point cloud images generated after depth and color alignment) according to the preset frame count.
Specific Operation Steps:
Enable the corresponding data stream based on the image type(s) to be saved. Refer to the table above for the relationship between image types and data streams.
Click
 to bring up the parameter settings interface.
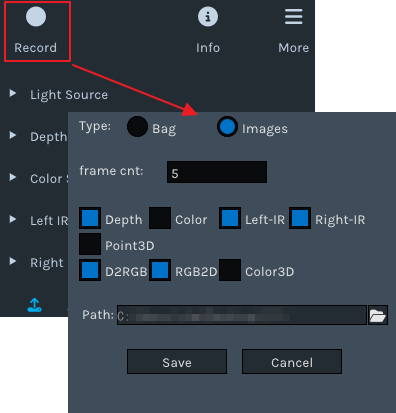
Record Parameter Settings Interface
Save Type select as Images.
Set the frame cnt parameter, which is the number of image frames to be saved.
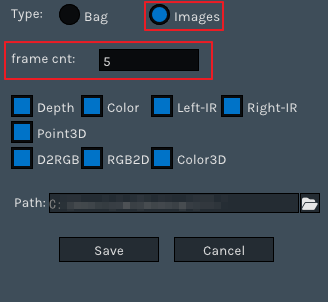
Set Frame Count for Continuous Image Saving Mode
Select the desired image type(s) to be saved. Both single and multiple selections are supported.
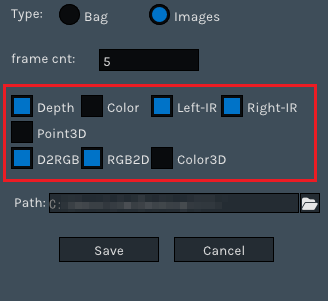
Select Image Type
Click
 to choose the save path for the images.
Click Save to begin continuously saving images.
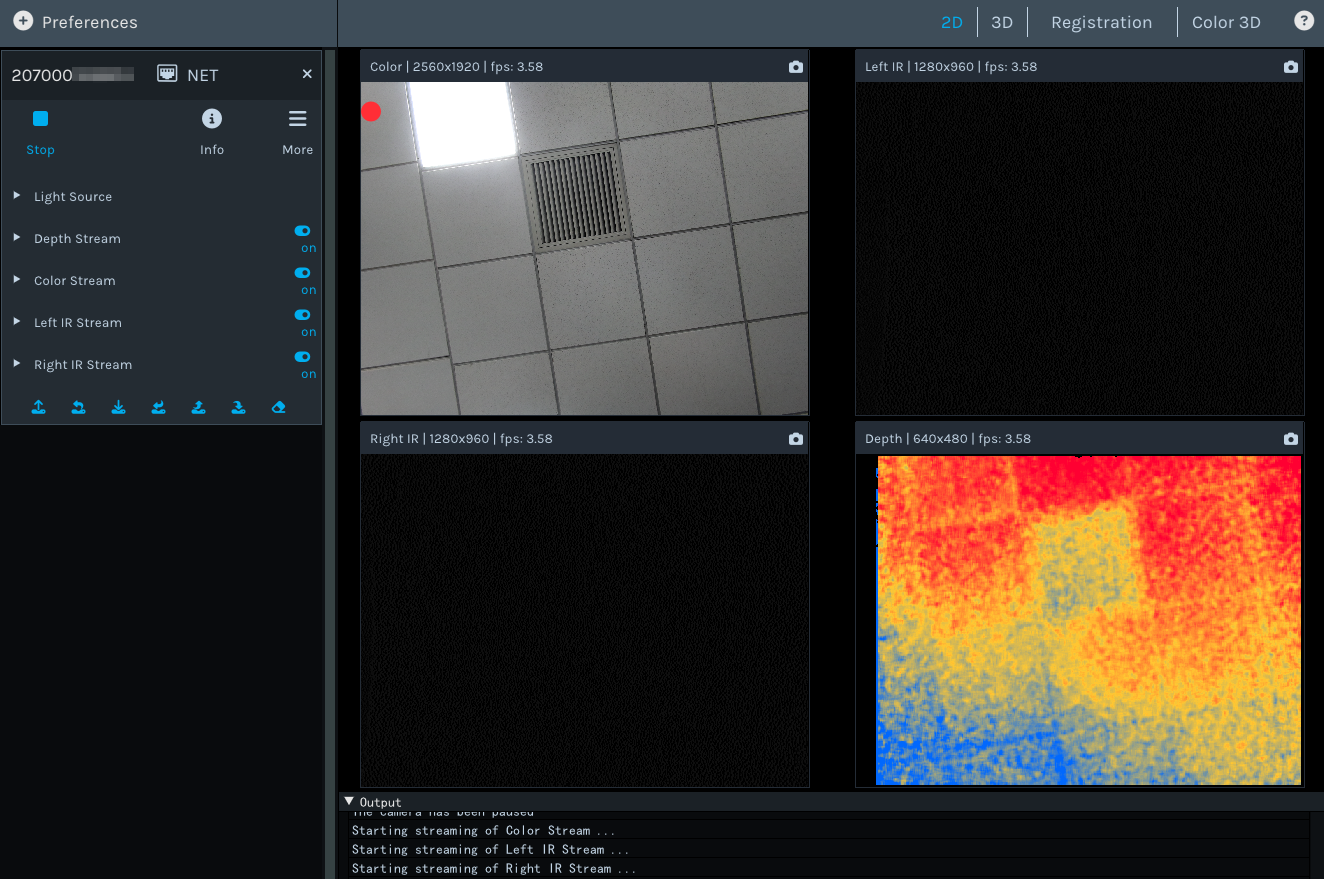
Continuous Image Saving Process
After saving the specified number of frames, the continuous image saving operation will automatically stop. If you need to stop the saving operation during the continuous image saving process, click
 .
.The save path of the images will be displayed in the upper right corner of the image display area and in the Log information display area.
Record Video
Percipio Viewer supports recording videos while capturing images from the camera. During video recording, some parameters can be adjusted, but enabling/disabling data streams is not supported.
Follow these steps to record video:
Start at least one data stream.
Click
 button to open the parameter settings interface.
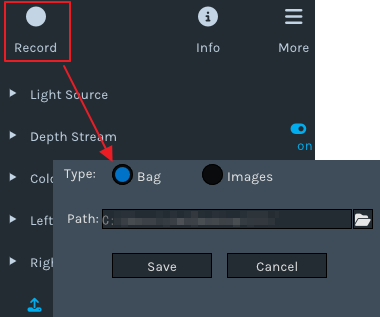
Record Parameter Settings Interface
Set the Save Type to Bag.
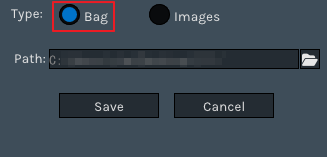
Switch Video Recording Mode
Click
 to select the video save path.
The
.bagfile name defaults to a timestamp and cannot be modified.Click Save to start recording.
Click
 to end recording.
The save path of the
.bagfile will be displayed in the upper right corner of the image display area and in the Log information display area.
To replay the recorded video, click Preferences then click Load Recorded Sequence from the drop-down menu, and select the target .bag.

Video Playback
Save/Load Parameter Settings
Percipio Viewer supports saving modified camera features (Controls parameters and image resolution) to a .json file to either local storage or the camera’s storage area, allowing the modified parameters to be loaded into the camera later.
Save Parameter Settings
Modify the camera features as needed. Camera features include parameters under the Controls category and image resolution.
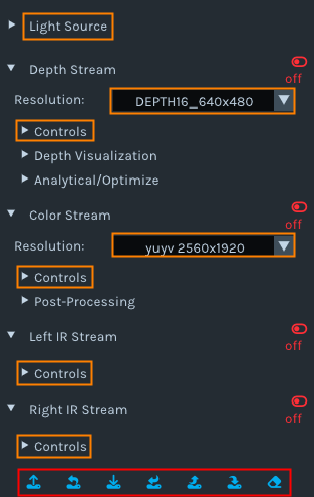
Save Parameter Settings
Click the corresponding icon to perform the parameter saving operation.
Click
 to save the modified parameters of the current camera to a local
 .jsonfile.
Click
 to save the modified parameters of the current camera as a
 .jsonfile to the camera’s Storage. The data written to the camera’s Storage area will not be lost after a power cycle.
Click
 to import a local
 .jsonfile into the camera’s Storage area. The data imported into the camera’s Storage area will not be lost after a power cycle.
Click
 to save the
 .jsonfile from the camera’s storage area to the local system.
Load Parameter Settings
Close all data streams.
Ensure that all data streams are off before proceeding with parameter loading.
Click
 to load a local
 .jsonfile. The parameter settings within the file will take effect immediately.
Click
 to load a
 .jsonfile from the current camera’s Storage area. The parameter settings within the file will take effect immediately.
Clear Data
Click
to clear all data in the current camera’s Storage.
Generate fetch_config.xml
Percipio Viewer supports generating a fetch_config.xml file for a specified camera, allowing for a comprehensive understanding of the components and features supported by the camera.
Create a new
.xmlfile namedfetch_config.Place the
.xmlfile in the same directory as the Percipio Viewer software.Open the software and select the camera. The system will automatically generate a
fetch_config.xmlfile corresponding to the selected camera. Thefetch_config.xmlfile contains all the components and features supported by the camera, allowing users to view detailed information.