This section provides guidance on setting up the development environment for building 3D vision applications, including the steps to download and compile the PercipioDC Camport SDK (hereinafter referred to as Camport SDK) on various operating systems.
Linux SDK supports AArch64, ARMv7hf, RaspberryPi, i686 and x86-64 hardware platforms, and provides corresponding library files for developers to compile programs. Linux SDK does not provide executable applications, you can generate executable applications by compiling sample programs.
The following is an example of setting up the development environment for Percipio depth camera on Linux platform, using Ubuntu 18.04:
Use the git command to obtain a local copy: Open the terminal, switch to the directory where the SDK should be stored, and enter the git clone command to clone the remote repository.
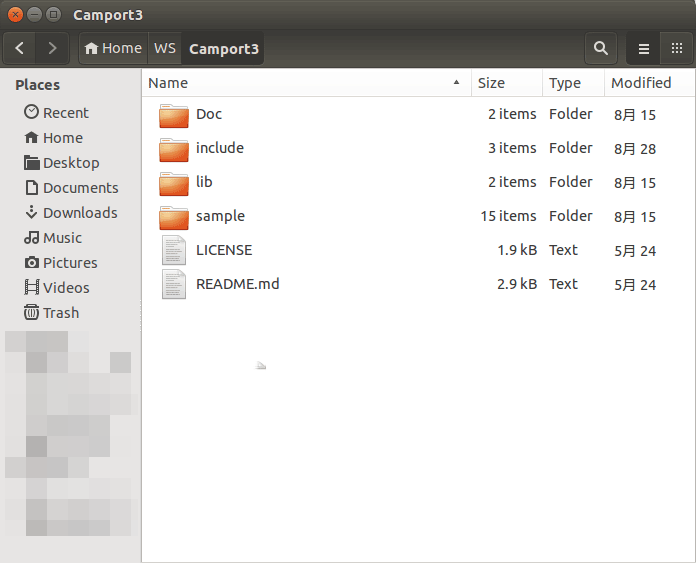
It stores the SDK API reference documentation. The documentation is a PDF file generated by Doxygen and includes descriptive information about classes, structures and interfaces.
include directory
It stores the header files used to call dynamic libraries:
TYImageProc.h: the header file for the image post-processing function interfaces.
TYCoordinateMapper.h: the header file for mapping of image space transformation.
TYApi.h: the header file for configuring the depth camera and obtaining image data. Users can develop their own applications based on these APIs.
lib/linux directory
It stores library files which support the Linux operating system and are compatible with AArch64, ARMv7hf, RaspberryPi, i686 and x86-64 hardware platforms.
lib/win directory
It stores library files which support the Windows operating system and are compatible with x64 and x86 hardware platforms.
sample directory
It stores sample programs for user programming reference. For more information about the sample programs, please refer to Sample program instructions.
The Camport SDK uses LibUSB as the user-space driver library for the USB depth camera by default. LibUSB software needs to be installed before using the Percipio USB depth camera.
CMake is a powerful, cross-platform tool tailored for software compilation. It streamlines the build process by enabling developers to define the build procedure in a platform-agnostic way through straightforward statements. CMake is capable of producing a range of makefiles or project files, facilitating the testing of C++ features supported by the compiler, akin to automake in UNIX environments. Notably, CMake’s configuration file is distinctively named CMakeLists.txt. Unlike directly assembling the final software, CMake’s primary role is to generate standardized build files, such as Makefiles for UNIX or projects/workspaces for Windows Visual C++, which are subsequently compiled using alternative tools.
The Camport SDK utilizes CMake to build standard projects. By harnessing the native build systems’ capabilities across different platforms, it can seamlessly adapt to a wide range of platform environments.
sudoapt-getinstallcmake
Note
Camport SDK requires users to install CMake 2.8.0 or higher versions.
OpenCV
The Camport SDK utilizes the OpenCV image processing library to render depth data transmitted from a Percipio depth camera. Prior to compiling the sample program, ensure the OpenCV image processing software library is installed.
sudoapt-getinstalllibopencv-dev
Note
Camport SDK requires users to install OpenCV 2.4.8 or higher versions.
If the target application does not use OpenCV for image display or other image processing calculations, there is no need to install OpenCV.
According to the permission management mechanism of Linux system, by default, root permission is required to access the Percipio USB depth camera. Non-root users can create a udev rule to modify the device permissions.
In the directory where the etc/udev/rules.d file is located, create a rule file with the extension .rules (such as 88-tyusb.rules), and add the user to the group specified in the file (such as: tofu). After rebooting the PC, you will have access to the USB depth camera. The content of the rule file is as follows:
The beginning of the rule file name must be a number (0 ~ 99), the larger the number, the higher the priority. Accessing the Percipio network depth camera does not require root permission.
After connecting to the computer, the depth camera starts system initialization until the Power light on the back of the camera blinks at a frequency of 1Hz. After initialization, run the following command with root privileges to capture images.
Use the git command to obtain a local copy: Open the terminal, switch to the working directory where the SDK should be stored, and enter the git clone command to clone the remote repository.
gitclonehttps://github.com/alphaliang/pcammls.git
Sample program instructions
The sample programs are stored in the python folder in the root directory of the development package:
framefetch.py: This sample program is used to capture depth and color images in free acquisition mode.
frame_fetchIR.py: This sample program is used to capture IR images in free acquisition mode.
frame_isp.py: This sample program is used to perform ISP post-processing on color images at the software level, converting RAW BAYER images with color cast into color images with standard color space.
frame_registration.py: This sample program is used to capture images of RGB-D registration.
frame_trigger.py: This sample program is used to set the camera to work in software trigger mode to capture depth maps.
multidevice_fetch.py: This sample program is used to set up multiple cameras for image acquisition.
point3d_fetch.py: This sample program is used to capture 3D point clouds (not displayed). Log information displays the number of point clouds and the coordinates of the center point cloud (X, Y, Z).
Download the SWIG source code (https://www.swig.org/download.html) to your host computer, extract it, and switch to the source code directory. Then, execute the following commands in order:
Windows SDK supports X86 (32-bit) and X64 (64-bit) hardware platforms, and provides driver files for Windows 7 and above operating systems. Windows SDK includes some executable applications (such as viewing depth maps) and sample programs for some applications.
The following is an example of setting up the development environment for Percipio depth camera on Windows platform, using Windows 10 64-bit system:
Use the git command to obtain a local copy: Open the terminal, switch to the working directory where the SDK should be stored, and enter the git clone command to clone the remote repository.
It stores the SDK API reference documentation. The documentation is a PDF file generated by Doxygen and includes descriptive information about classes, structures and interfaces.
include directory
It stores the header files used to call dynamic libraries:
TYImageProc.h: the header file for the image post-processing function interfaces.
TYCoordinateMapper.h: the header file for mapping of image space transformation.
TY_API.h: the header file for configuring the depth camera and obtaining image data. Users can develop their own applications based on these APIs.
lib/linux directory
It stores library files which support Linux operating system and are compatible with AArch64, ARMv7hf, RaspberryPi, i686 and x86-64 hardware platforms.
lib/win directory
It stores library files which support the Windows operating system and are compatible with x64 and x86 hardware platforms.
sample directory
It stores sample programs for user programming reference. For more information about the sample programs, please refer to Sample program instructions.
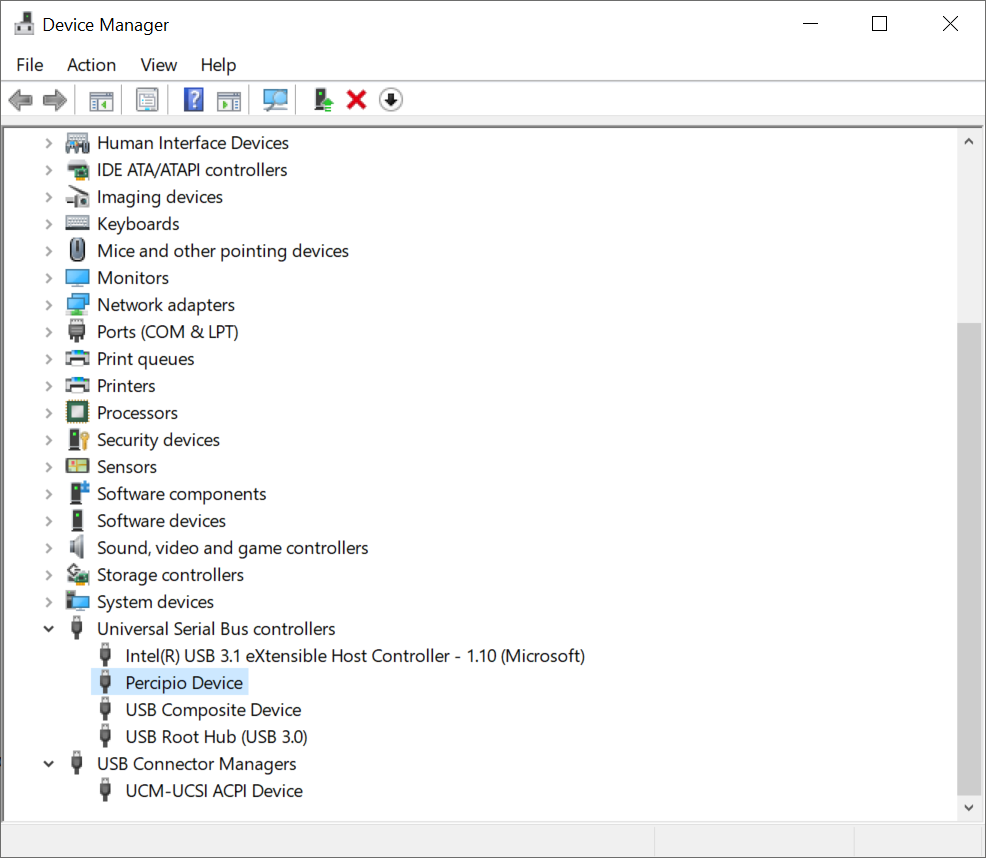
After connecting the Percipio depth camera to a Windows PC using a USB cable, right-click on the Start in the bottom left corner of the desktop and click on Device Manager in the Start menu. In Device Manager, an unrecognized USB device PERCIPIODEVICEEE can be found, as shown in the following image:
Right-click on the device and select Update driver. Choose the driver from the lib/win/driver directory in the Camport3 SDK according to the Windows version of your PC, and follow the system prompts to complete the driver installation.
CMake is a powerful, cross-platform tool tailored for software compilation. It streamlines the build process by enabling developers to define the build procedure in a platform-agnostic way through straightforward statements. CMake is capable of producing a range of makefiles or project files, facilitating the testing of C++ features supported by the compiler, akin to automake in UNIX environments. Notably, CMake’s configuration file is distinctively named CMakeLists.txt. Unlike directly assembling the final software, CMake’s primary role is to generate standardized build files, such as Makefiles for UNIX or projects/workspaces for Windows Visual C++, which are subsequently compiled using alternative tools.
The Camport SDK utilizes CMake to build standard projects. By harnessing the native build systems’ capabilities across different platforms, it can seamlessly adapt to a wide range of platform environments.
Note
Camport SDK requires users to install CMake 2.8.0 or higher versions.
OpenCV
The Camport SDK utilizes the OpenCV image processing library to render depth data transmitted from a Percipio depth camera. Prior to compiling the sample program, ensure the OpenCV image processing software library is installed.
Note
Camport SDK requires users to install OpenCV 2.4.8 or higher versions.
If the target application does not use OpenCV for image display or other image processing calculations, there is no need to install OpenCV.
When installing Visual Studio, you need to select the Visual C++ library module for installation as well, otherwise compilation will not be successful. If you do not know how to install the Visual C++ library, you can contact Percipio technical support.
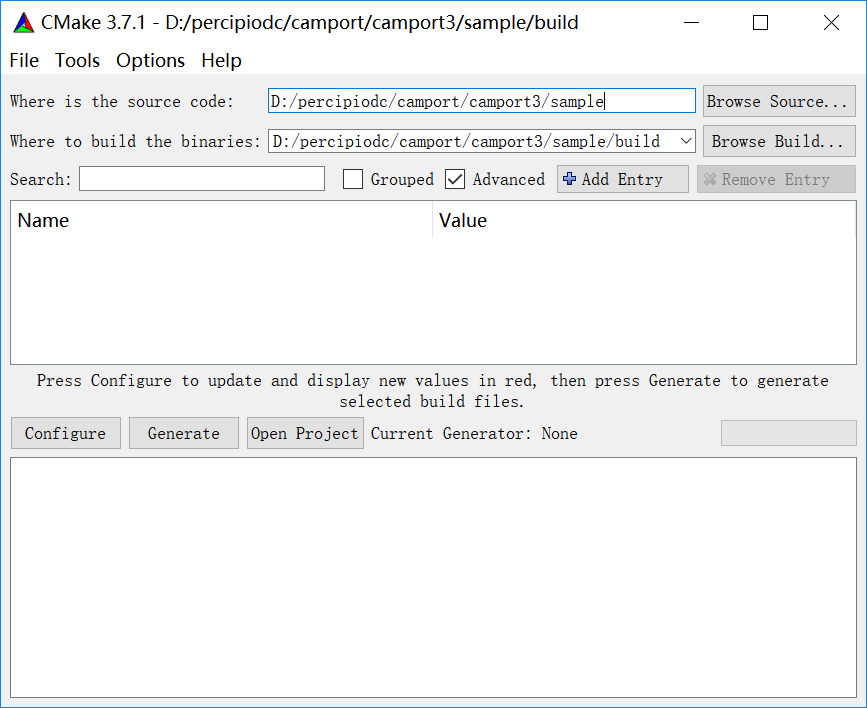
To compile the sample programs, do the following:
Create a directory named build in the SDK sample directory.
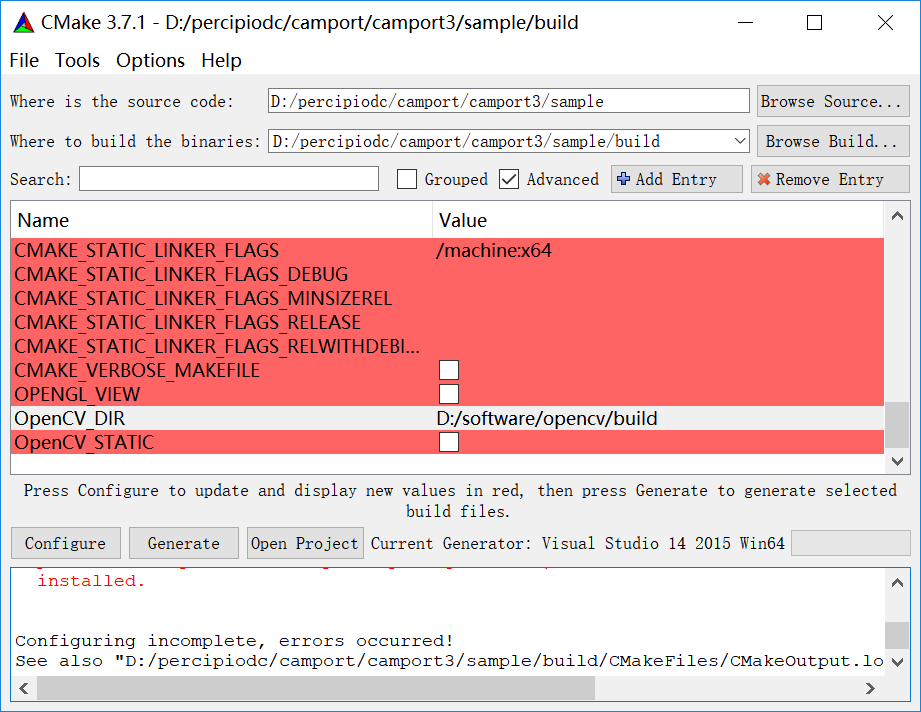
Start cmake-gui.
Specify the source code directory as sample and the output directory for compilation as sample/build.
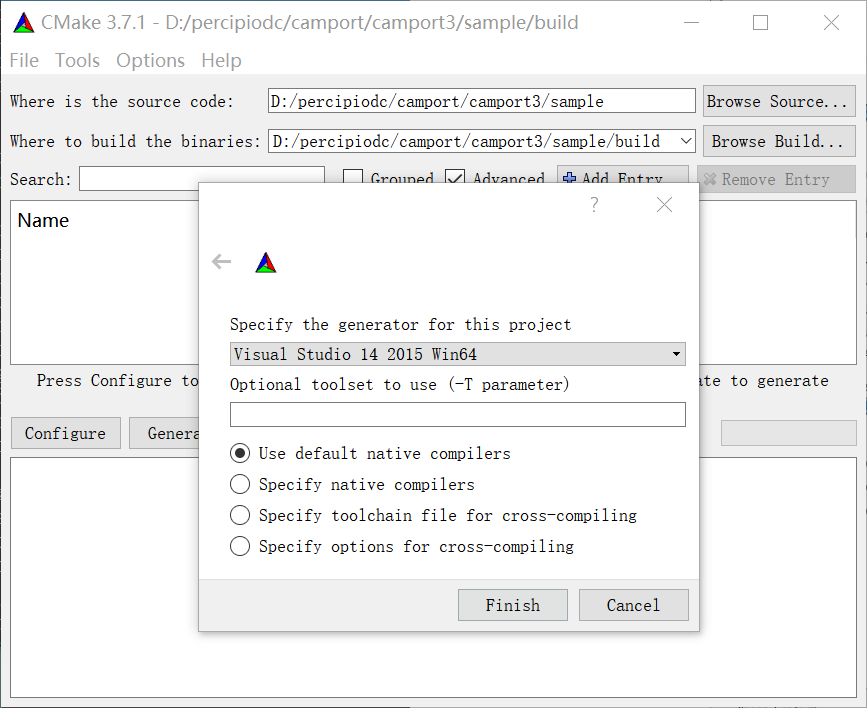
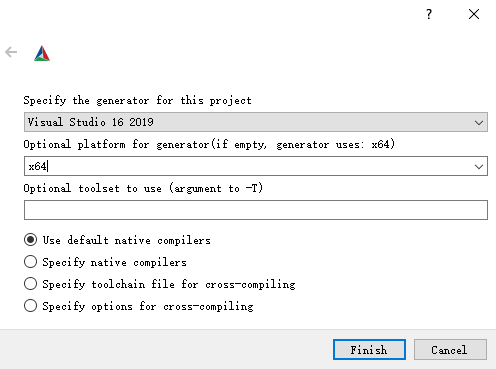
Click on Configure, select your version of Visual Studio, and click on Finish.
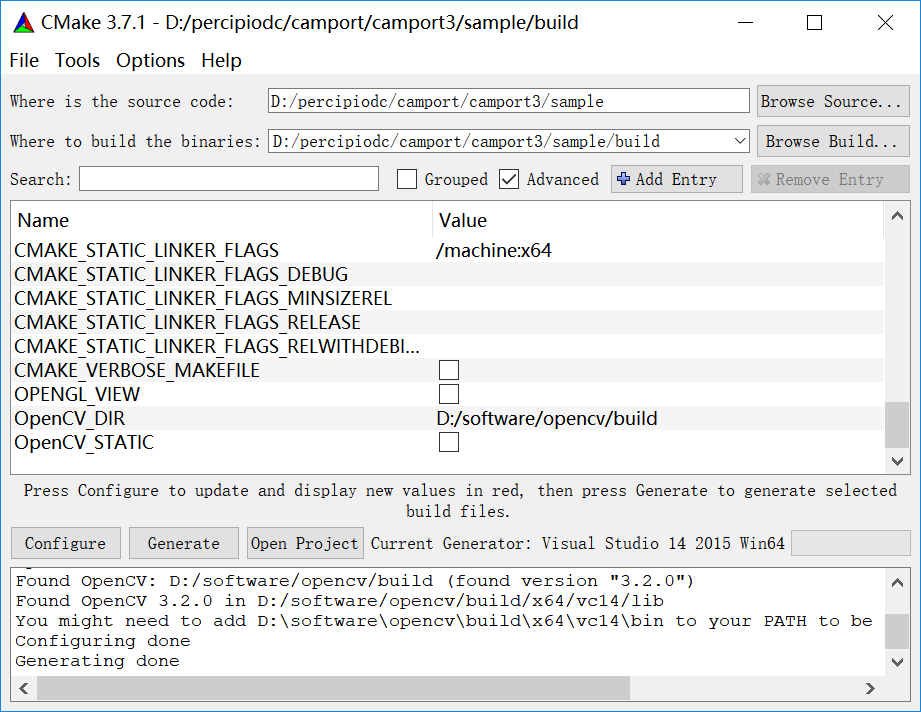
Specify the file path in the OpenCV_DIR column as opencv/build.
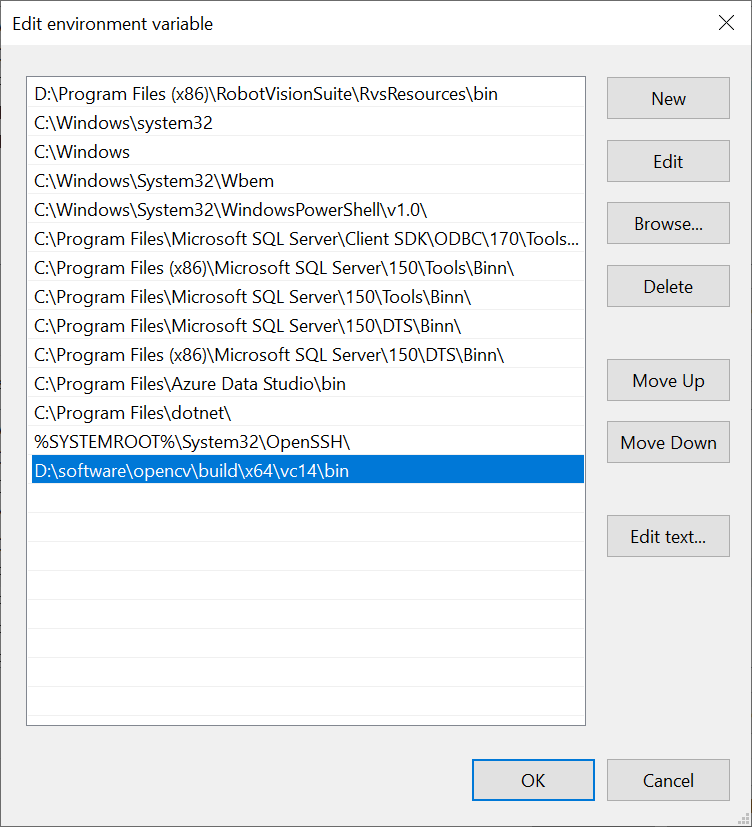
Configure the path of the OpenCV library in the system environment variables.
Specific steps: Enter Environment Variables dialog box, select the “Path” column and click on Edit, and configure the path of the OpenCV library in the Edit Environment Variables dialog box.
Click on Generate.
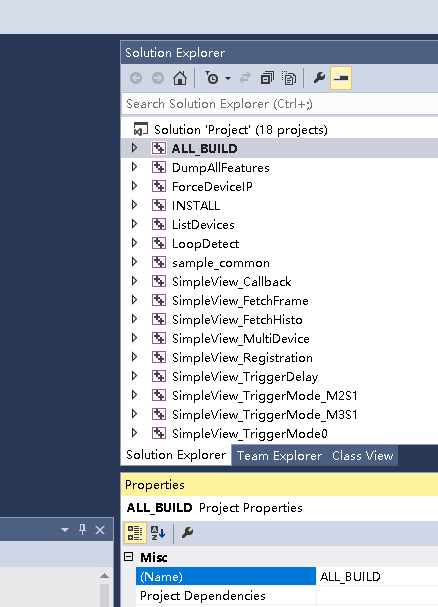
Click on Open Project to open the project.
Note
Afterwards, the project can be opened with the Project.sln or ALL_BUILD.vcxproj file in the camport3/sample/build path.
Build Project: In the Visual Studio menu bar, click on Build> Build Solution.
After connecting to the PC, the depth camera will start initializing until the Power light on the back of the camera flashes at a frequency of 1Hz. After successful initialization, in the Windows 10 X64 system, you can get the depth map by running the executable file lib/win/hostapp/x64/SimpleView_FetchFrame.exe in the development package.
Alternatively, you can copy tycam.dll from the development package lib/win/hostapp/x64 directory to the folder sample/build/bin/Release generated by the compilation, and run SimpleView_FetchFrame.exe in the folder to capture the depth map.
Use the git command to obtain a local copy: Open the terminal, switch to the working directory where the SDK should be stored, and enter the git clone command to clone the remote repository.
gitclonehttps://github.com/alphaliang/pcammls.git
Sample program instructions
The sample programs are stored in the python folder in the root directory of the development package:
framefetch.py: This sample program is used to capture depth and color images in free acquisition mode.
frame_fetchIR.py: This sample program is used to capture IR images in free acquisition mode.
frame_isp.py: This sample program is used to perform ISP post-processing on color images at the software level, converting RAW BAYER images with color cast into color images with standard color space.
frame_registration.py: This sample program is used to capture images of RGB-D registration.
frame_trigger.py: This sample program is used to set the camera to work in software trigger mode to capture depth maps.
multidevice_fetch.py: This sample program is used to set up multiple cameras for image acquisition.
point3d_fetch.py: This sample program is used to capture 3D point clouds (not displayed). Log information displays the number of point clouds and the coordinates of the center point cloud (X, Y, Z).
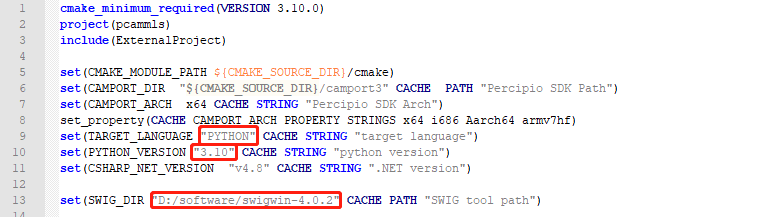
Configure environment variables: Right-click on This PC, select Properties > Advanced system settings > Environment Variables, in the Environment Variables page, add the executable file path of the local SWIG to the system variable Path.
Open the CMakeLists.txt in the pcammls directory, and modify the target language (PYTHON), PYTHON version, and SWIG’s local path in the file as shown in the following figure:
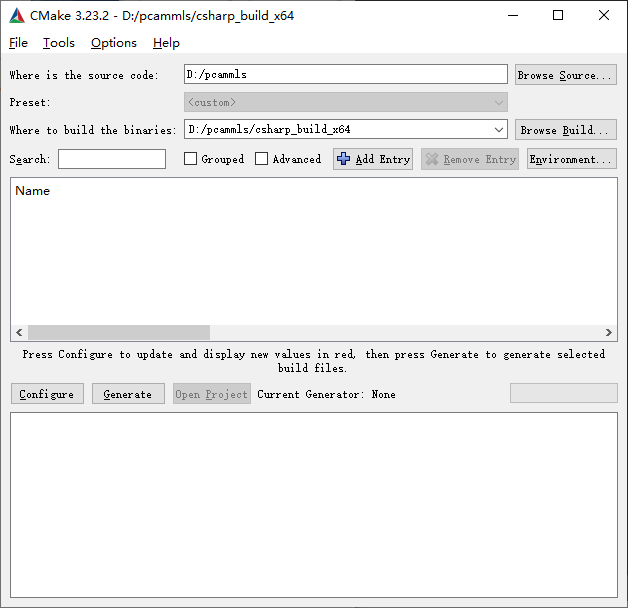
Create a new folder in the pcammls directory and name it python_build_x64.
Start cmake-gui, specify the source code directory as pcammls, and specify the build output directory as pcammls/python_build_x64.
Click on Configure, select the Visual Studio version and X86/X64 version settings.
Click on Generate.
Click on Open Project to open the project, then select Release in the Visual Studio menu bar and click on Build > Build Solution in order.
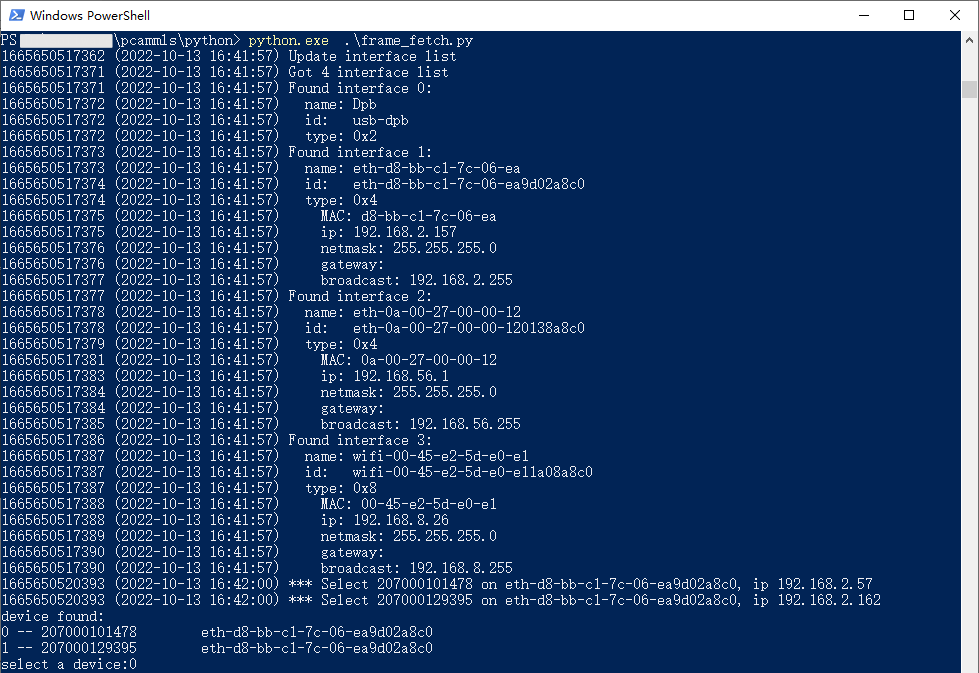
After compilation, copy the generated dynamic libraries pcammls.py and _pcammls.pyd, as well as the tycam.dll, to the pcammls/python directory. Open Windows PowerShell and run the generated python file.
Use the git command to obtain a local copy: Open the terminal, switch to the working directory where the SDK should be stored, and enter the git clone command to clone the remote repository.
gitclonehttps://github.com/alphaliang/pcammls.git
Sample program instructions
The sample programs are stored in the csharp folder in the root directory of the development package:
fetch_frame.cs: This sample program is used to capture depth and color images in free acquisition mode.
fetch_IR.cs: This sample program is used to capture IR images in free acquisition mode.
fetch_isp.cs: This sample program is used to perform ISP post-processing on color images at the software level, converting RAW BAYER images with color cast into color images with standard color space.
fetch_registration.cs: This sample program is used to capture images of RGB-D registration.
fetch_trigger.cs: This sample program is used to set the camera to work in software trigger mode to capture depth maps.
fetch_point3d.cs: This sample program is used to capture 3D point clouds (not displayed). Log information displays the number of point clouds and the coordinates of the center point cloud (X, Y, Z).
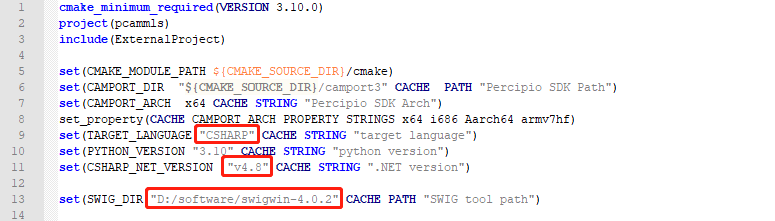
Configure environment variables: Right-click on This PC, select Properties > Advanced system settings > Environment Variables, in the Environment Variables page, add the executable file path of the local SWIG to the system variable Path.
Open the CMakeLists.txt in the pcammls directory, modify the target language (CSHARP), the installed version of .NET Framework on your host computer, and the local path of SWIG.
Create a new folder in the pcammls directory and name it csharp_build_x64.
Start cmake-gui, specify the source code directory as pcammls, and specify the build output directory as pcammls/csharp_build_x64.
Click on Configure, select the Visual Studio version and X86/X64 version settings.
Click on Generate.
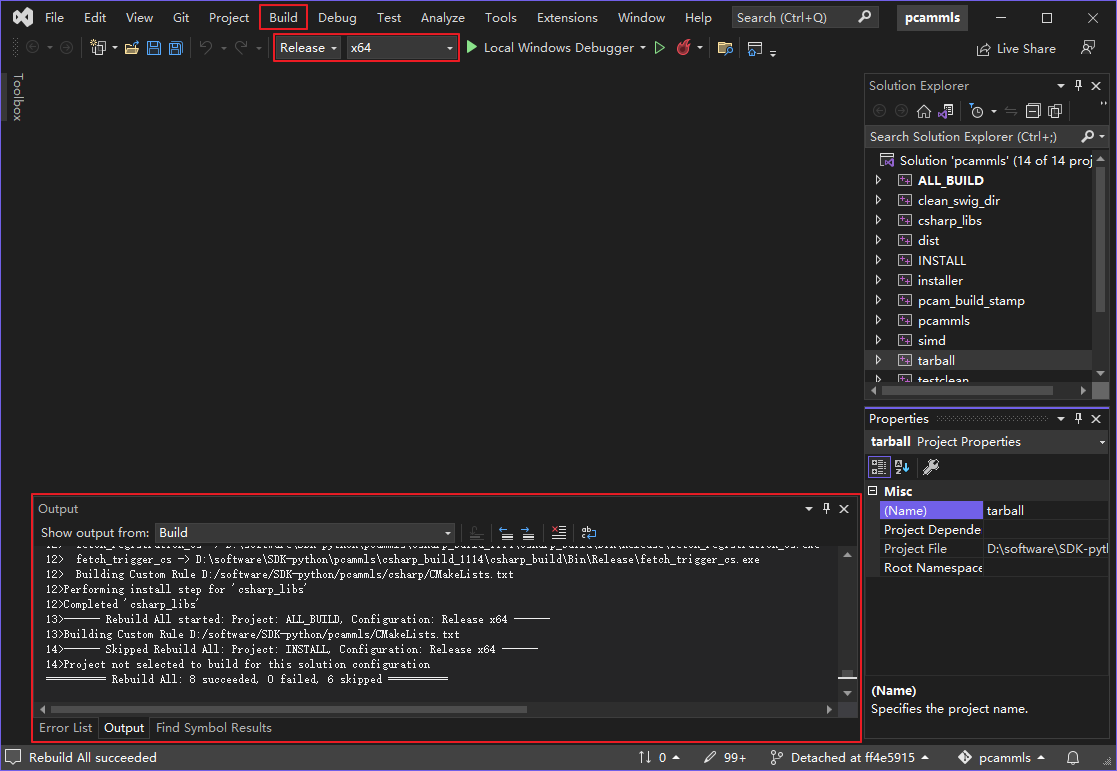
Click on Open Project to open the project, then select “Release” in the Visual Studio menu bar and click on Build > Build Solution in order.
Note
After modifying the source code, you need to rebuild the executable files by selecting “Release” in the Visual Studio menu bar and then click on Build > Rebuild Solution.
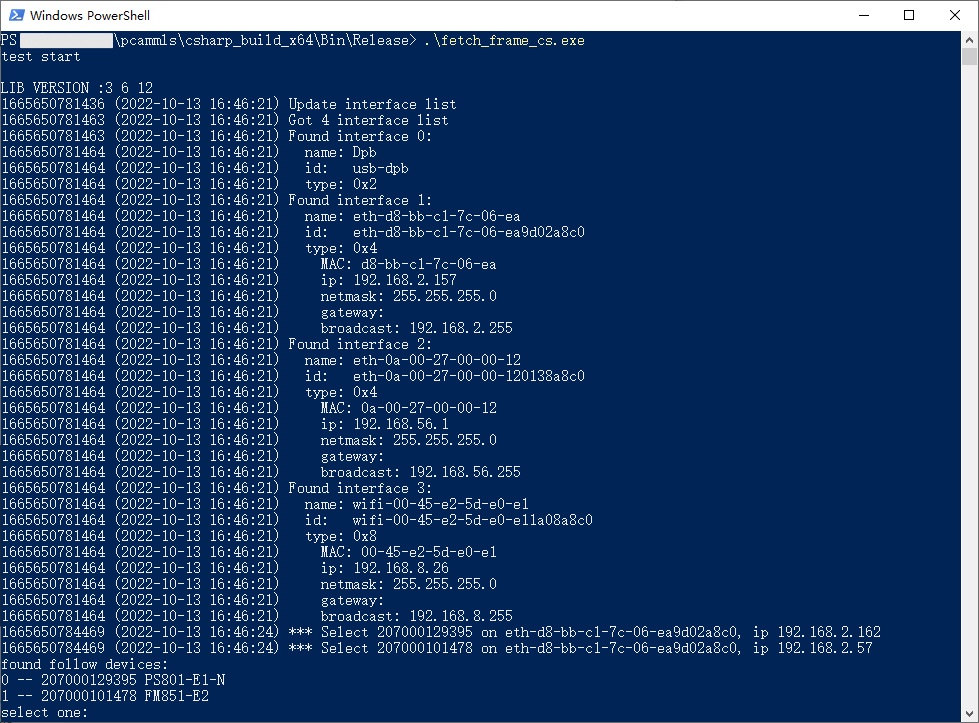
After compilation, copy the dynamic library tycam.dll in the camport3/lib/win/hostapp/x64 directory to the pcammls/csharp_build_x64/Bin/Release directory, open Windows PowerShell, and run the generated executable files.
ROS (Robot Operating System, hereinafter referred to as ROS) is an open-source meta-operating system suitable for robots. It provides the services that an operating system should have, including hardware abstraction, underlying device control, implementation of common functions, inter-process messaging, and package management.
Use the git command to obtain a local copy: Open the terminal, switch to the working directory where the SDK should be stored, and enter the git clone command to clone the remote repository.
To compile the sample programs, execute the following command in the root directory of the development package:
catkin_make
Tip
If the catkin command is not installed, you need to install catkin first.
After compilation, the build folder (containing intermediate files) and the devel folder (containing header files, dynamic/static libraries and executable files) will be generated.
Set the switch for alignment of depth and color images in the default:
<argname="depth_registration"default="true"/>
Note
This enable switch will only take effect when the color image and the depth map are both captured. This setting is invalid for cameras without RGB modules.
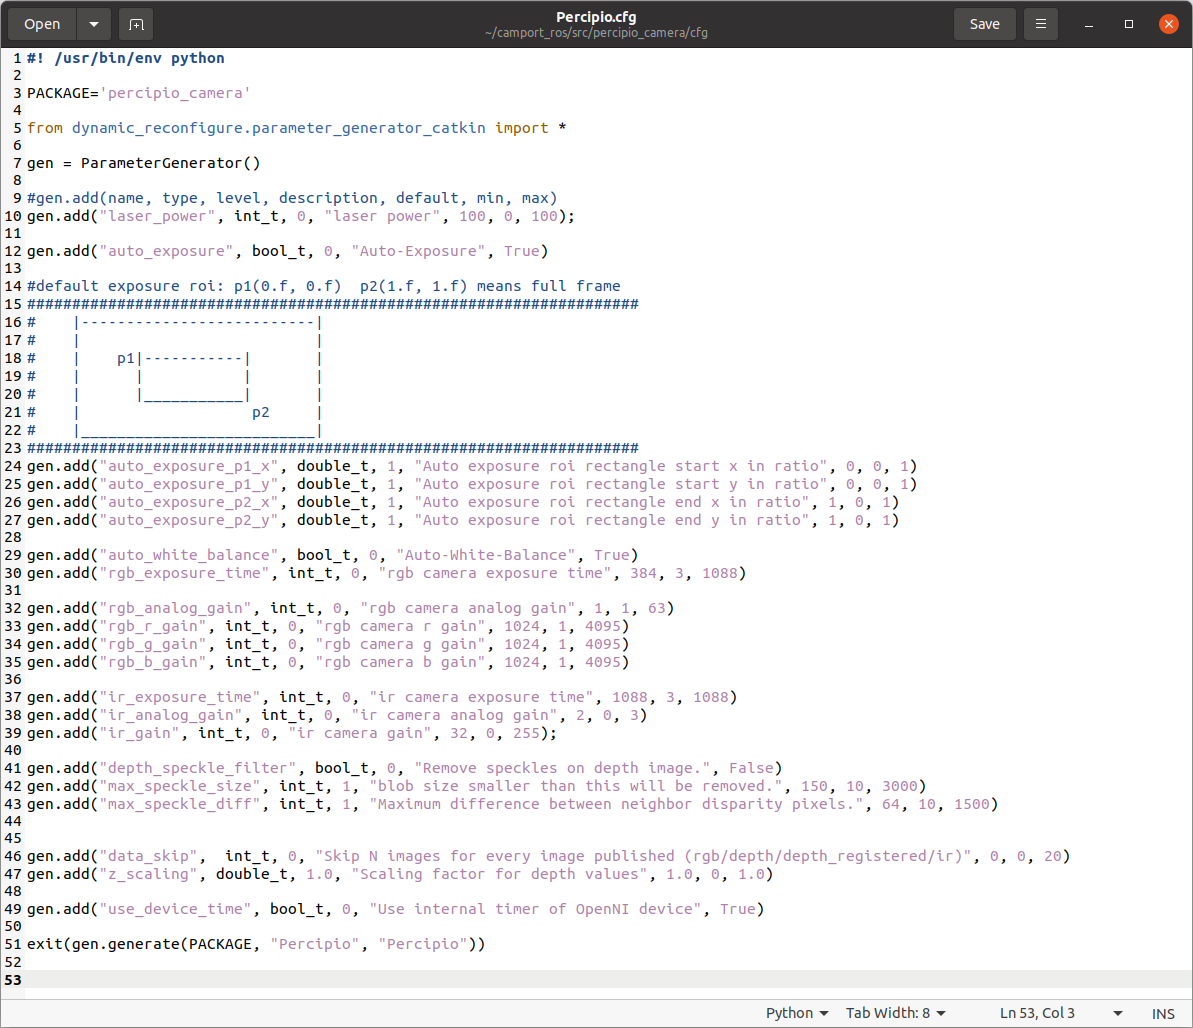
The parameters in the Percipio.cfg file support dynamic adjustment. After modifying the maximum and minimum values of the Percipio.cfg parameters, refer to the running section to bring up the rqt_reconfigure_Param page and make adjustments.
Execute the following command in the root directory of the software package to open the Percipio.cfg file.
cdsrc/percipio_camera/cfg/geditPercipio.cfg
Set the minimum and maximum values for the parameters in gen.add().
Tip
gen.add(name, type, level, description, default, min, max) represents the feature name, type, level, description, default value, minimum value, and maximum value.
Boolean values must be written as True or False (with the first letter capitalized).
Note
If you don’t know the minimum and maximum values of camera features, you can view the supported components and features of the camera by one of the following steps:
Run the SDK sample program DumpAllFeatures to view the components and features supported by the camera in the listed information.
Run the SDK sample program DumpAllFeatures-d and check the supported components and features of the camera in the generated fetch_config.xml file.
The setting range of the following parameters can be customized:
depth_speckle_filter: Speckle filter switch. Speckle filtering is used to filter out small speckle noise in the depth map.
max_speckle_size: The maximum size of speckle noise. Speckles larger than this setting are considered not to be noise. It is recommended to set the range between [10, 3000].
max_speckle_diff: The maximum depth difference between adjacent pixels in the same speckle. If the depth difference between adjacent pixels is greater than this set value, then those adjacent pixels are considered to belong to two different speckles. It is recommended to set the range between [10, 1500].
data_skip: Frame skipping. For example, if the publishing node of Percipio is actually 30fps, but the receiving node of ROS only wants to receive 10fps, you can set data_skip to 3. It is recommended to set the range between [0,20].
z_scaling: the depth value unit of the pixel in the depth map. It is recommended to set the range to [0,8].
use_device_time: Default setting is True, indicating the use of the camera’s internal timestamp; when set to False, it indicates the use of ROS timestamp.
Execute the following commands to recompile. After compilation, the changes made to Percipio.cfg will take effect.
Refer to the percipio.launch document to create multiple .launch. Configure “camera” and “device_id” with different values in each .launch file. For example, to run two devices simultaneously, create two .launch files, namely percipio_camera1.launch and percipio_camera2.launch.
percipio_camera1.launch contains the following content:
Download the Halcon (Windows version) installation package from the Halcon official website (https://www.mvtec.com/downloads) and install Halcon according to the official documentation.
Important
The installation package ImageAcquisitionInterfaces must be installed. If there are no special requirements, it is recommended to check all installation packages and install them.
If the Halcon version is 18.11.04.0 or above, please follow the steps below to download the Camport3_Halcon_gentl SDK.
If the Halcon version is lower than 18.11.04.0, please go to the official GitHub page of Percipio to download the Camport3_Halcon SDK. This section does not introduce the usage of the SDK. If you have any questions, please contact Percipio technical support.
Choose any of the following methods to download the Camport3_Halcon_gentl SDK:
Use the git command to obtain a local copy: Open the terminal, switch to the working directory where the SDK should be stored, and enter the git clone command to clone the remote repository.
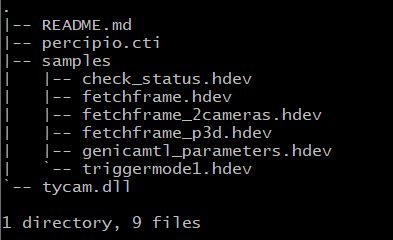
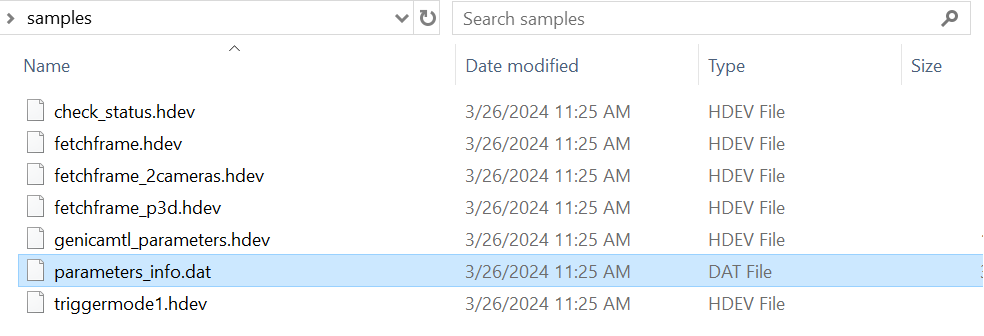
It stores sample programs for user programming reference.
check_status.hdev: This sample program is used to display the status of the camera connection.
fetchframe.hdev: This sample program is used to capture image data from one depth camera.
fetchframe_2cameras.hdev: This sample program is used to simultaneously capture images with two depth cameras and output image data.
fetchframe_p3d.hdev: This sample program is used to capture 3D point clouds.
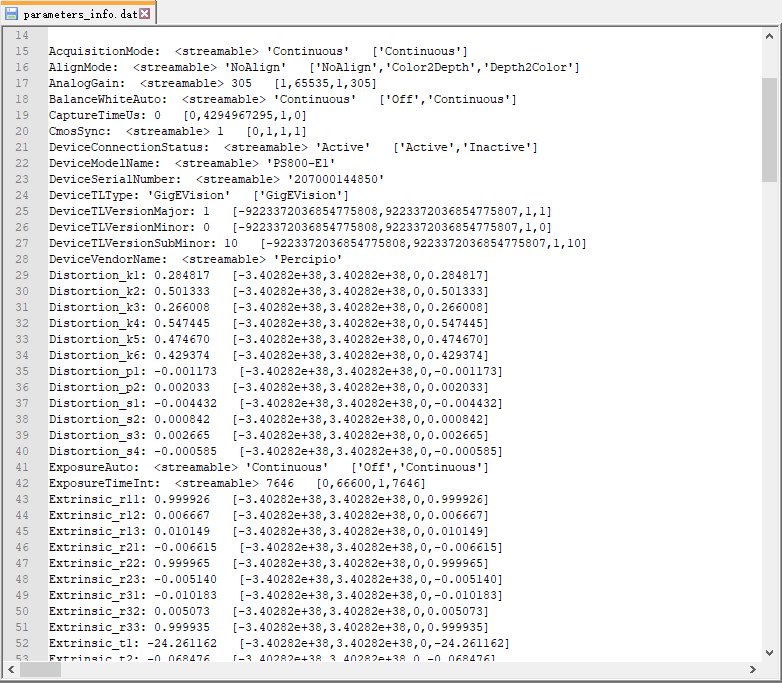
genicamtl_parameters.hdev: This sample program is used to enumerate the parameters supported by Percipio.
triggermode1.hdev: This sample program is used to set the depth camera to work in mode 1. The camera captures images and outputs image data when it receives a software trigger command or a hardware trigger signal.
Others
The samples directory also includes:
percipio.cti: The implementation file of GenTL Producer.
tycam.dll: The dynamic link library of Percipio SDK, which is a dependency for GenTL Producer.
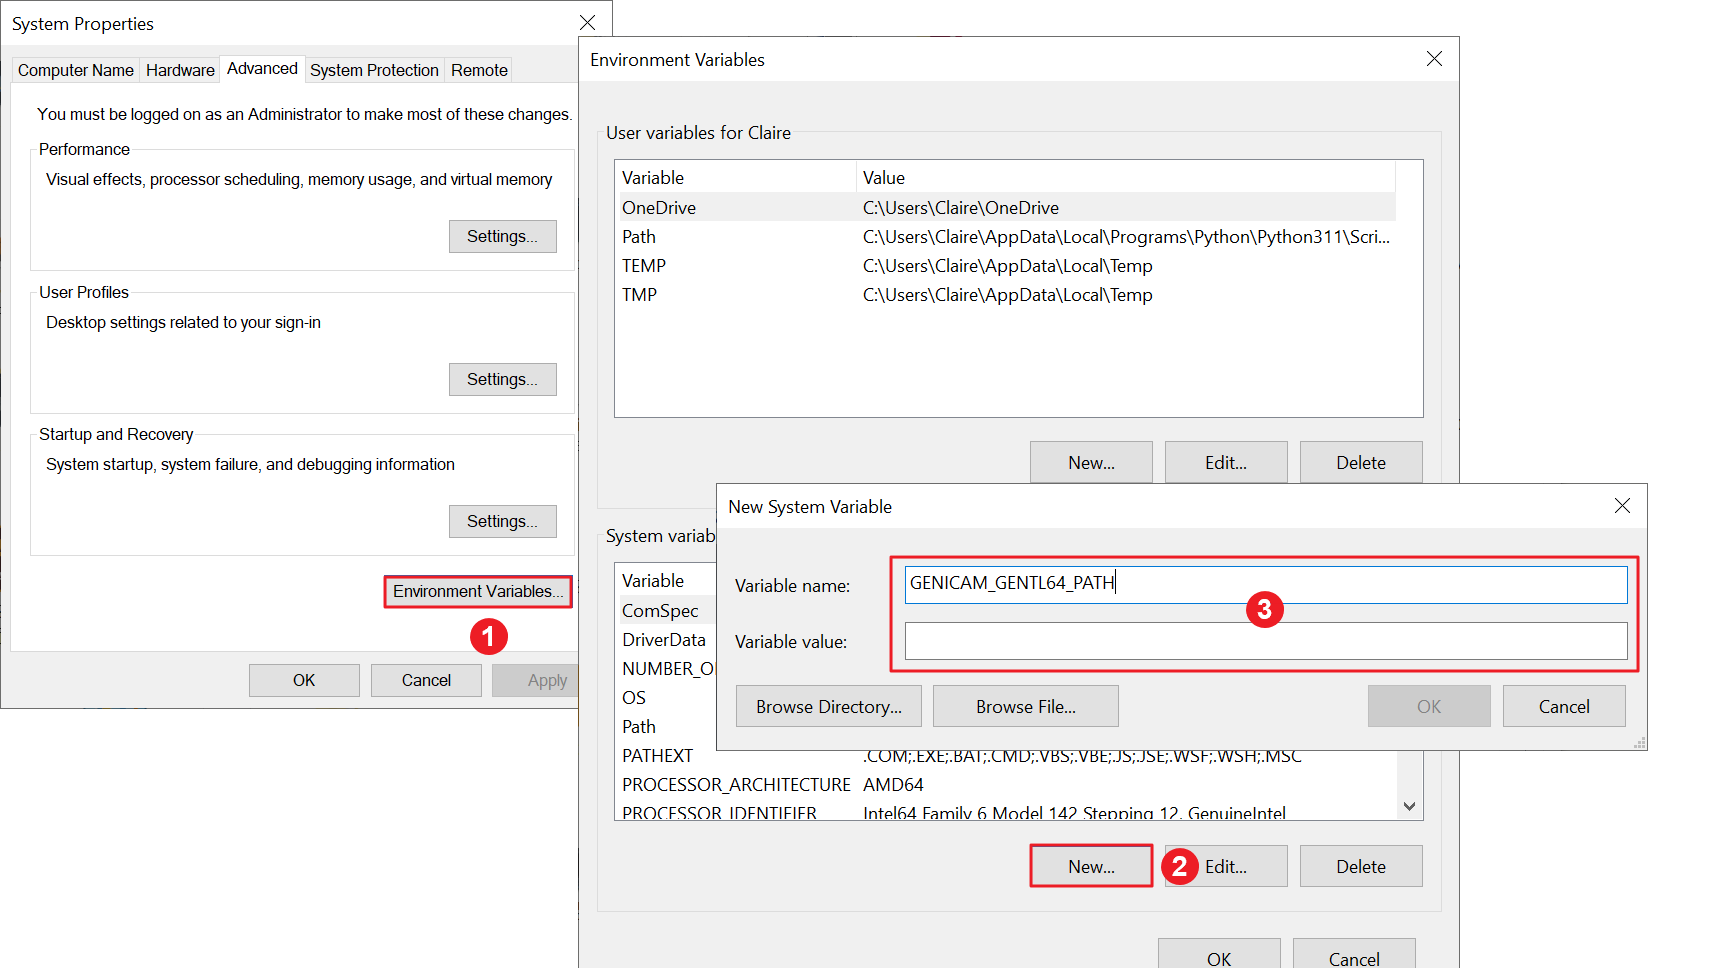
Enter the environment variables page and create a new environment variable. The variable name is GENICAM_GENTL64_PATH, and the variable value is the storage path of percipio.cti, which is the Camport3_Halcon_gentl SDK folder path. After rebooting the computer, the configuration will take effect.
AcqHandle displays the obtained handle.
The Image variable and the graphic window display the captured color image.
The sample code of reading and writing parameters according to the camera features is as follows. For more information about camera features, please refer to Viewing camera features.
Percipio has tested VisionPro 9.0 and confirmed that it can open the Percipio camera normally. It is recommended to use this tested version of VisionPro.
This section mainly introduces how to run the Percipio camera in VisionPro. The steps are as follows:
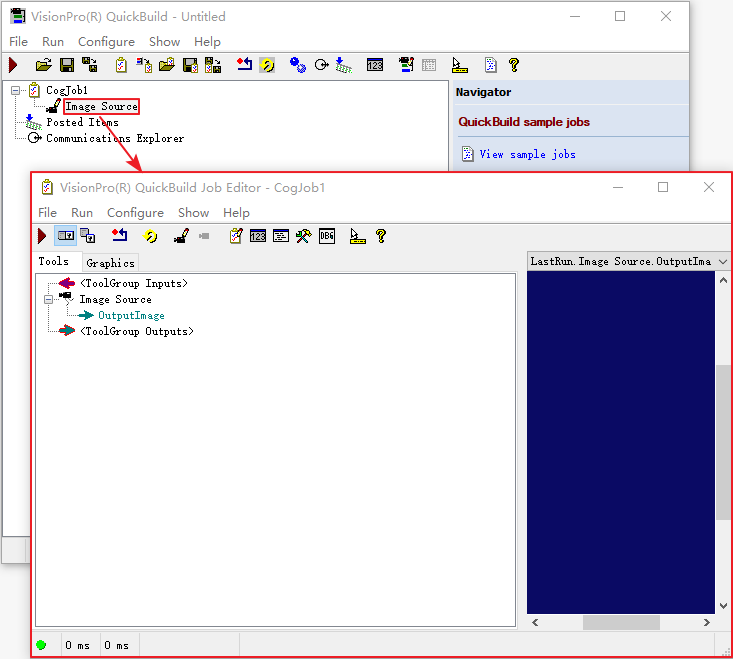
Double-click to run the VisionPro software.
Double-click on “Image Source” to enter VisionPro(R) QuickBuild Job Editor - CogJob1 page.
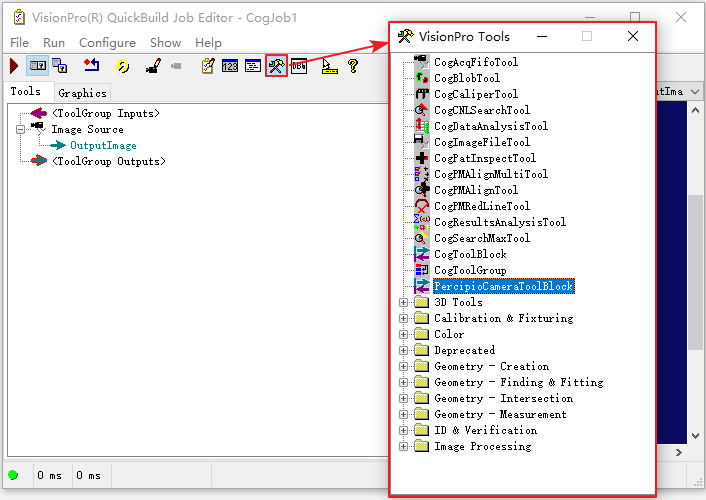
Click on the “Show VisionPro Tools” icon to bring up the VisionPro Tools page.
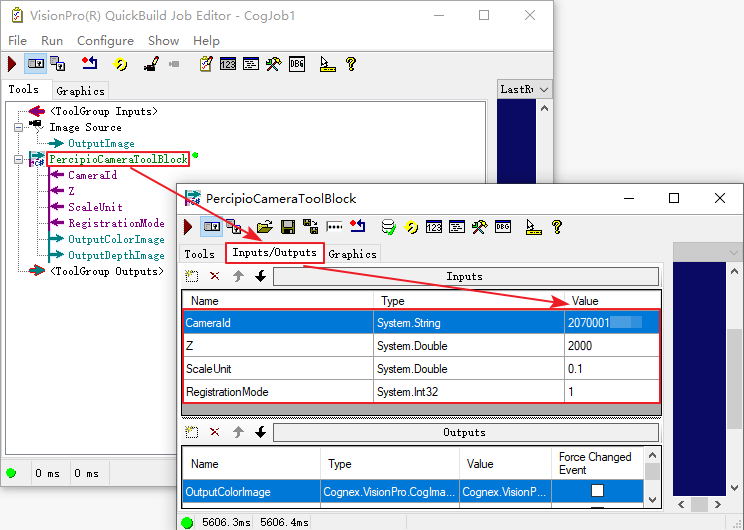
Double-click on “PercipioCameraToolBlock” and add it to the ToolGroup.
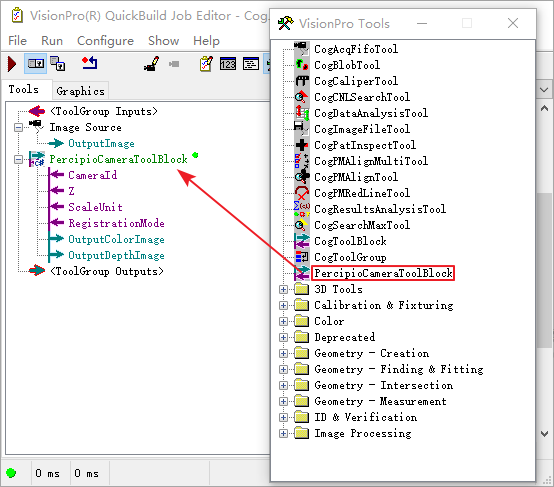
Double-click on “PercipioCameraToolBlock”, select the “Input/Output” tab in the PercipioCameraToolBlock page, and set the input parameters.
CameraId: Set camera serial number.
Z: Set the distance between the camera and the projection plane in the Z direction, in millimeters. Perform an orthogonal projection of the depth map onto this projection plane. With the camera field of view at this distance and the depth map resolution, the size of a single pixel (in millimeters) can be calculated for subsequent calculations.
ScaleUnit: Set the ScaleUnit feature of the camera to output depth values with different precisions.
RegistrationMode: Set the RGBD registration switch. 0: no registration; 1: rgb2depth; 2: depth2rgb.
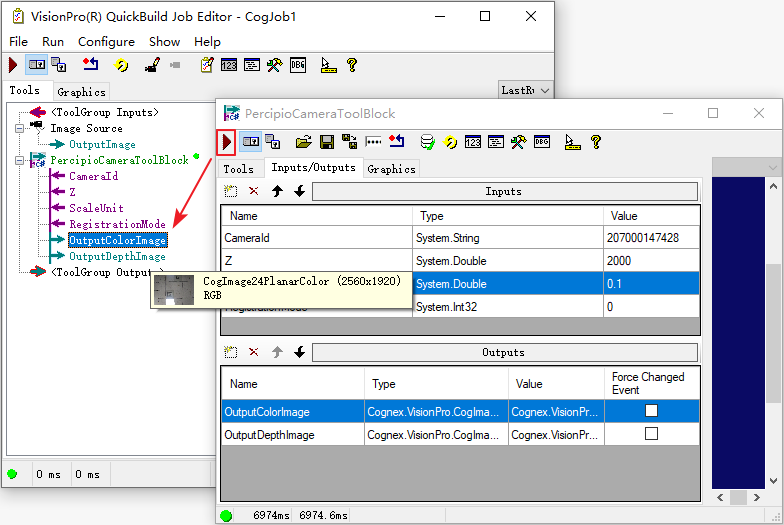
Click on the “Run” icon. You can view the images captured by the camera in the output terminal.
Afterwards, add other tools according to actual needs, and connect the output port of PercipioCameraToolBlock to the input port of other tools.
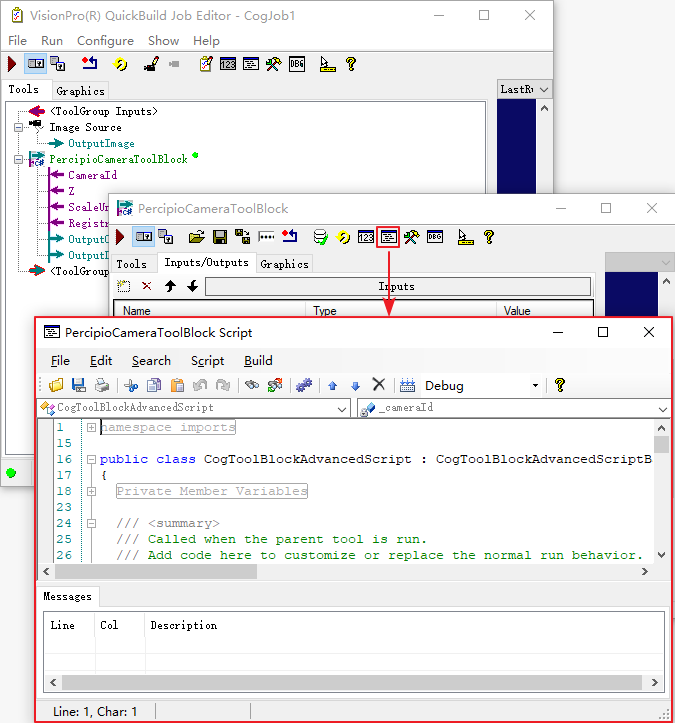
Optional: If you have secondary development needs for PercipioCameraToolBlock, you can click on the “Create/Edit Script” icon and edit the script.
Cross-compilation development environment for host computer and camera
Percipio network cameras support to run the customized embedded applications within the camera, and allow users to fully utilize their internal computational resources for image pre-processing or application logic processing. For specific camera models that support embedded applications, please consult Percipio technical support.
.. Percipio network cameras allow users to fully utilize their internal computational resources for image pre-processing or application logic processing.
Note
USB depth cameras do not support users running embedded applications within the camera.
Execute ./build.sh in the SDK root directory. After execution is complete, you will find the generated executable file RawFetchFrame in the ./build/bin directory.
Refer to the SDK’s ./Sample/RawFetchFrame, develop the application after creating a program directory using OpenCV in the Sample directory.
Modify ./Sample/CMakeLists.txt, add the program directory path that uses OpenCV in ALL_SAMPLES.
Execute ./build.shopencv, after execution is completed, an executable file will be generated in the ./build/bin directory.
Copy the executable file to the user application folder of the camera using scp or sftp . At the same time, copy the required OpenCV library to the camera. The OpenCV library is located in the ./ThirdPartyLib/Opencv-3.4/lib directory. Please refer to Installation of programs and library files.
Execute the sync command to permanently save the modifications to the flash.
Note
The copying process is divided into two steps. First, it is necessary to copy to the /mnt/ram directory to prevent errors due to insufficient file system space during the decompression process if the application is a compressed package.
When there are few files, you can choose not to use compressed files. However, when there are many files, it is recommended to pack them and then copy them to the camera for decompression. Currently, the camera supports several types of compressed files: tar, tar.gz, tar.bz2, and unencrypted zip files. They can be decompressed using the following commands: tar-xvf, tar-xzvf, tar-xjvf and unzip.
The maximum storage capacity for the user’s secondary development directory /usr/local is 25MB.
After decompressing the file, be sure to copy it to the user directory, otherwise the content in /mnt/ram will be lost after rebooting.
The library file libtycam.so used in development is already included in the camera file system, so users do not need to copy it again to /usr/local/lib.
Users need to use the command chmoda+xELFS_FILENNAME to grant execution permissions to applications or scripts.
XXX.XXX.XXX.XXX is the IP address of the target camera.
By default, the system uses DHCP mode to obtain an IP address dynamically.
Static IP settings
Log in to the camera to execute the instructions below, or modify the configuration file below in the application or script to configure the IP. It is not recommended to use ifconfig or other methods to directly modify the IP to avoid confusion in camera IP management. After modifying the configuration file using this method, it will be permanently stored in the camera and take effect after rebooting.
Please be cautious when modifying the IP address, subnet mask, and gateway; setting incorrect values may result in being unable to connect to the camera.
Be sure to execute the sync command in the console to write the changes to the storage system and reboot the device.
NTP server configuration
Tip
Before configuring the NTP server, you need to set the camera’s time synchronization method to NTP time synchronization. For more details, please refer to Time synchronization settings.
The camera supports NTP time synchronization and the default NTP servers used are: ‘cn.ntp.org.cn’, ‘0.ubuntu.pool.ntp.org’, ‘1.ubuntu.pool.ntp.org’.
If the user has set up an NTP server, they can execute the following command to add the IP or domain name of the NTP server in /etc/ntp_server :