C++ (Linux Platform)
Linux SDK supports AArch64, ARMv7hf, RaspberryPi, i686 and x86-64 hardware platforms, and provides corresponding library files for developers to compile programs. Linux SDK does not provide executable applications, the developers can generate executable applications by compiling sample programs.
The following is an example of setting up the development environment for Percipio depth camera on Linux platform, using Ubuntu 20.04:
Download Camport4 SDK
Choose any of the following methods to download Camport4 SDK:
Access https://github.com/percipioxyz/camport4.git using a browser and download the Camport4 SDK.
Use the git command to obtain a local copy: Open the terminal, switch to the directory where the SDK should be stored, and enter the
git clonecommand to clone the remote repository.git clone https://github.com/percipioxyz/camport4.git
The directory structure of Camport4 SDK is shown in the following figure:
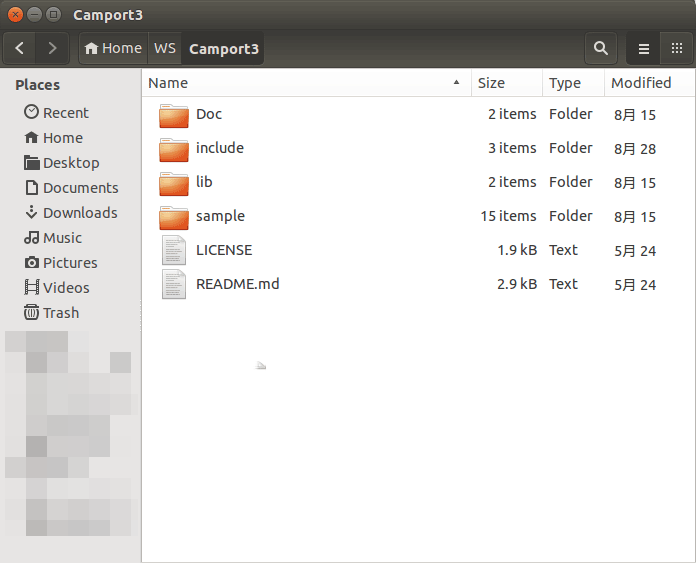
Camport4 SDK Directory Structure
Doc Directory
It stores the SDK API reference documentation. The documentation is generated by Doxygen and includes descriptive information about classes, structures and interfaces.
include Directory
It stores the header files used to call dynamic libraries:
TYImageProc.h: the header file for the image post-processing function APIs.TYCoordinateMapper.h: the header file for mapping of image space transformation.TY_API.h: the header file for configuring the depth camera and obtaining image data. Users can develop their own applications based on these APIs.TYVer.h: the header file for retrieving SDK version information.TYParameter.h: the header file for the GenICam standard APIs.TYDefs.h: the header file for Camport SDK data types.
lib/linux Directory
It stores library files which support the Linux operating system and are compatible with AArch64, ARMv7hf, RaspberryPi, i686 and x86-64 hardware platforms.
lib/win Directory
It stores library files which support the Windows operating system and are compatible with x64 and x86 hardware platforms.
sample Directory
It contains subfolders including cloud_viewer, common, sample_v1, sample_v2 and sample_genicam_sfnc, where sample_v1, sample_v2 and sample_genicam_sfnc include sample programs provided for users to refer to when programming. For more details about the sample programs, please refer to Sample Program Descriptions.
Install Dependencies
Install Cmake
Install Cmake by inputting the following command in the terminal:
sudo apt-get install cmake
Check if the installation is successful by checking the version information.
cmake --version
Note
The recommended CMake version is 3.24.0. Other versions are not tested and the compatibility is not guaranteed.
Install OpenCV (Optional)
sudo apt-get install libopencv-dev
Note
The recommended OpenCV version is 4.5.5. Other versions are not tested and the compatibility is not guaranteed.
If the target application does not use OpenCV for image display or other image processing calculations, there is no need to install OpenCV.
Install USB Driver (Optional)
When you are using a USB camera, installing the USB driver is necessary for compiling and running the Camport SDK.
sudo apt-get install libusb-1.0-0-dev
Set USB Camera Access Permissions (Optional)
According to the permission management mechanism of Linux system, by default, root permission is required to access the Percipio USB camera. Non-root users can create a udev rule to modify the device permissions.
The setup steps are as follows:
Direct to directory “etc/udev/rules.d”, create a rule file with the extension
.rules(such as 88-tyusb.rules).Note
The beginning of the rule file name must be a number (0 ~ 99), the larger the number, the higher the priority.
sudo nano /etc/udev/rules.d/88-tyusb.rules
Add the following rules in the rule file. The example below is to add the USB device to the
tofuuser group.SUBSYSTEM== "usb",ATTRS{idProduct}=="1003",ATTRS{idVendor}=="04b4",GROUP="tofu",MODE="0666" SUBSYSTEM== "usb",ATTRS{idProduct}=="1004",ATTRS{idVendor}=="04b4",GROUP="tofu",MODE="0667"
After restarting the PC, access permission to the USB depth camera will be granted.
Compile Sample Programs
Environment Setup
Enter the
camport4directory and execute the following command to copy the necessary library files and prepare for compilation.sudo cp lib/linux/lib_x64/libty* /usr/lib/ cd sample mkdir build cd build
Build Execution
Run the following commands to compile. Replace
/home/{SDK-path}with your actual SDK installation path.cmake .. -DTYCam_DIR=/home/{YOUR_SDK_PATH}/camport4 make
Configuring Build Options for Sample Programs
The commands above compile all sample programs (
sample_genicam_sfnc,sample_v1,sample_v2) by default.You can customize the build by adding the following parameters to the
cmakecommand based on your needs:To exclude
sample_v1andsample_genicam_sfnc:cmake .. -DBUILD_SAMPLES=off
To exclude
sample_v2:cmake .. -DBUILD_CPLUSPLUS_SAMPLE=off
To exclude
sample_genicam_sfnc:cmake .. -DBUILD_SAMPLE_GENICAM_SFNC=off
To compile
sample_v2without OpenCV dependency:cmake .. -DBUILD_SAMPLES=off -DBUILD_SAMPLE_V2_WITH_OPENCV=off
Configuring Build Options for Image Display
Image display is enabled by default during the CMake configuration. The build system will select a display backend automatically in the following order of preference:
OpenCV is used first if it is detected on the system.
If OpenCV is not found, the system falls back to using the lighter-weight, native Linux X11 interface.
To disable image display entirely, add this parameter to your
cmakecommand:cmake -DBUILD_SAMPLE_WITH_GUI=OFF ..
The compiled executable files will be generated in the camport4/sample/build/bin directory.
Run Sample Executables
After connecting to the computer, the depth camera will initiate system initialization. Once the power indicator light stabilizes to a steady 1-second on, 1-second off blinking pattern, you can run the following command with root privileges to receive and view real-time depth maps.
sudo ./SimpleView_FetchFrame