ROS 2 Platform
ROS 2 (Robot Operating System 2) is the second-generation version of the Robot Operating System. It is an open-source robotics software framework designed to provide tools and libraries to simplify the creation and management of robotic applications. Developed and maintained by Open Robotics, ROS 2 inherits many advantages of ROS 1 while improving its architecture and features to meet the needs of modern robotic systems.
Set up ROS 2 Development Environment
Install the corresponding ROS 2 development platform based on the Ubuntu version.
Ubuntu20.04: ROS 2 Foxy
Ubuntu22.04: ROS 2 Humble
Install dependencies.
sudo apt install python3-colcon-common-extensions
sudo apt install ros-foxy-camera-info-manager
sudo apt install ros-foxy-image-publisher
sudo apt install ros-foxy-diagnostic-updater
sudo apt install python3-colcon-common-extensions
sudo apt install ros-humble-camera-info-manager
sudo apt install ros-humble-image-publisher
sudo apt install ros-humble-diagnostic-updater
Set Up USB Camera
If you need to use a USB camera, complete the Set Up USB Camera steps first.
Download Camport ROS 2 SDK
Create a workspace directory.
mkdir -p ~/ros2_ws/src
cd ~/ros2_ws/src/
Choose any of the following methods to download Camport ROS 2 SDK:
Access https://gitee.com/percipioxyz/camport_ros2 using a browser and download the Camport ROS 2 SDK.
Use the git command to obtain a local copy: Open the terminal, switch to the working directory where the SDK should be stored, and enter the
git clonecommand to clone the remote repository.git clone https://gitee.com/percipioxyz/camport_ros2.git
The directory structure of Camport ROS 2 SDK is as follows:
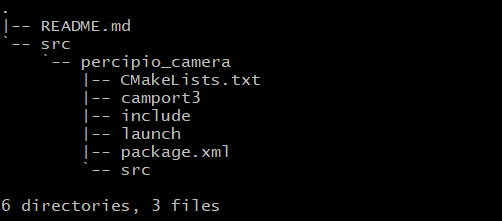
Camport ROS 2 SDK Directory
README.md: Briefly describes the ROS 2 compilation process.src/percipio_camera/CMakeLists.txt: CMake build system configuration file.src/percipio_camera/camport3: Contains library files and header files for the Percipio SDK.src/percipio_camera/include: Contains header files.src/percipio_camera/launch: Contains ROS 2 launch files for initializing nodes and setting parameters.src/percipio_camera/package.xml: Describes the package manifest, including the name, version, author information, license, and build dependencies.src/percipio_camera/src: Contains main source code files, including node implementations and camera drivers.
Configure Environment Variables
source /opt/ros/foxy/setup.bash
echo "source /opt/ros/foxy/setup.bash" >> ~/.bashrc
source /opt/ros/humble/setup.bash
echo "source /opt/ros/humble/setup.bash" >> ~/.bashrc
Build the Project
cd ~/ros2_ws/src/camport_ros2/
colcon build --event-handlers  console_direct+  --cmake-args  -DCMAKE_BUILD_TYPE=Release
sudo echo "source ./install/setup.bash" >> ~/.bashrc
source ~/.bashrc
Tip
- colcon build Instructions:
--event-handlers console_direct+: This option sets the event handler, whereconsole_direct+ensures that detailed build event information is streamed directly to the console. This provides a clear, real-time view of each build step and any potential errors, enhancing troubleshooting and process transparency.--cmake-args -DCMAKE_BUILD_TYPE=Release: This option passes additional CMake parameters. In this case,-DCMAKE_BUILD_TYPE=Releasesets the CMake build type to Release. This means that the build will be optimized and suitable for a release version rather than a debug version.
- After compilation, the following folders are generated.
build: Contains intermediate and object files.install: Includes executables, libraries, headers, and other resources.log:Contains logs generated during build and runtime.
Modify Parameter Configurations
Parameters to be loaded at camera start up can be configured in the percipio_camera.launch.py or multi_cam.launch.py launch file.
Important
Through the launch file, only part of the parameters can be configured. To configure all parameters of the camera, you may opt to use Percipio Viewer to write the camera settings into Storage in advance. Subsequently, when the camera is powered on, the parameters will already be in the configured state. For the setup procedure, please refer to the Percipio Viewer User Guide: Manage Parameter Configuration.
Follow the steps below to configure parameters in the launch file.
Navigate to the path: ``camport3_ros2/install/percipio_camera/share/percipio_camera/launch``.
Modify parameter configurations.
For single-camera setups, open the
percipio_camera.launch.pyfile and modify parameter configurations as needed. The description of configurable parameters is shown in the table below.Specify the camera serial number
DeclareLaunchArgument('serial_number', default_value='"207000106930"'),
Specify the camera IP address
DeclareLaunchArgument('device_ip', default_value='192.168.120.112'),
Note
If neither SN nor IP is specified, the first detected camera is opened by default.
If using multiple cameras, open the
multi_cam.launch.pyfile and modify the parameter configurations as needed. Descriptions of the configurable parameters are provided in the table below.The
multi_cam.launch.pyfile is by default configured for two cameras. If more cameras need to be configured, please add launch x (where x = 3, 4, …, n) by following the format of launch 1 and launch 2.
Launch Camera Node
ros2 launch percipio_camera percipio_camera.launch.py
ros2 launch percipio_camera multi_cam.launch.py
Note
Do not close the terminal running the service during operation.
Subscribe to Topics
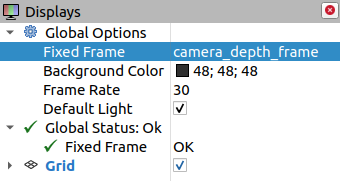
Open a new terminal and run RViz:
ros2 run rviz2 rviz2
Add Image Display.
In the Global Options on the left panel, set Fixed Frame to camera_depth_frame.
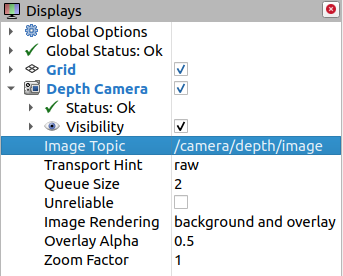
Add depth map Display.
Click add, select Camera, and name it Depth Camera.

In the settings for the newly added Depth Camera on the left panel, set Image Topic to /camera/depth/image.
Add Color Image Display.
Click add, select Camera, and name it Color Camera.
Check the newly added Color Camera on the left panel and set Image Topic to /camera/color/image_raw.
Add Left IR Image Display.
Click add, select Camera, and name it Left IR Camera.
Check the newly added Left IR Camera on the left panel and set Image Topic to /camera/left_ir/image_raw.
Add Right IR Image Display.
Click add, select Camera, and name it Right IR Camera.
Check the newly added Right IR Camera on the left panel and set Image Topic to /camera/right_ir/image_raw.
Add Raw Point Cloud Display.
Click add, select PointCloud2, and name it Point Cloud.
Check the newly added Point Cloud on the left panel and set PointCloud2 Topic to /camera/depth/points.
Add Registered Point Cloud Display.
Click add, select PointCloud2, and name it Registered Point Cloud.
Check the newly added Registered Point Cloud on the left panel and set PointCloud2 Topic to /camera/depth_registered/points.