Linux-C++ 二次开发实现
RVS提供函数接口列表
RVS 软件提供了大量的函数接口,为了方便查询,将一些常用的接口统一整理在此处,除此外还有部分对于数据处理或相机参数接口,请在安装目录下的 include\ 文件夹下自行查询。
添加参数
| 定义于头文件: < CommandServerNode > < Node > < TCPServerNode > < ThreadNode > | |
|---|---|
| void AppendBoolParameter(const std::string& name, bool& variable, bool default_val=false) | 在属性面板上添加 Bool 类型的参数 |
| void AppendIntParameter(const std::string& name, int& variable, int default_val=0,const std::string& min="MIN", const std::string& max="MAX", const std::string& flag="") | 添加 Int 类型的参数 |
| void AppendFloatParameter(const std::string& name, float& variable,float default_val=0.f,const std::string& min="MIN", const std::string& max="MAX", const std::string& flag="") | 添加 Float 类型的参数 |
| void AppendDoubleParameter(const std::string& name, double& variable,double default_val=0.0,const std::string& min="MIN",const std::string& max="MAX", const std::string& flag="") | 添加 Double 类型的参数 |
| void AppendStringParameter(const std::string& name, std::string& variable, const std::string& default_val="") | 添加 String 类型的参数 |
| void AppendFileParameter(const std::string& name, std::string& variable,const std::string& extension="",const std::string& default_val="") | 添加 File 类型的参数,可在本地路径选择文件 |
| void AppendDirectoryParameter(const std::string& name, std::string& variable, const std::string& default_val="") | 添加 Dir 类型的参数,可在本地路径选择文件夹 |
| void AppendEnumParameter(const std::vector< std::string >& enum_names, const std::string& name, std::string& variable,const std::string&default_val="") |
添加Enum类型的参数,在属性面板上呈现下拉框,下拉框中内容需提前定义 |
| void AppendPoseParameter(const std::string& name, Pose& pose,double default_x=0.0, double default_y=0.0, double default_z=0.0,double default_rx=0.0, double default_ry=0.0, double default_rz=0.0) | 添加Pose类型的参数 |
添加/删减算子端口
| 定义于头文件:< CommandServerNode > < Node > < TCPServerNode > < ThreadNode > | |
|---|---|
| void RegisterInput(const std::string & type,const std::string & name,bool is_list=false) | 注册输入节点,Input/InputList类型 |
| void RegisterOutput(const std::string & type,const std::string & name,bool is_list=false) | 注册输出节点,Output/OutputList 类型 |
| bool UnregisterInput(unsigned int index) | 取消注册输入,填入index |
| bool UnregisterOutput(unsigned int index) | 取消注册输出,填入 index |
| unsigned int GetInputDimension() | 获得输入的维度 |
| unsigned int GetOutputDimension() | 获得输出的维度 |
定义事件
| 定义于头文件:< CommandServerNode > < Node > < TCPServerNode > < ThreadNode > | |
|---|---|
| typedef std::function |
用户自定义事件函数 |
| void RegisterInputEvent(const std::string & name, EventFunction func) | 注册一个Input端口,去触发这个算子中用户自定义的事件函数,与算子中Process()不冲突 |
| bool IsEventIdle(int index) | 检测这个事件是否时空闲状态 |
| bool IsEventTriggered(int index) | 检测这个事件是否被触发 |
| bool IsEventError(int index) | 检测这个事件是否出现错误 |
| void SetEventIdle(int index) | 当这个事件空闲时,定义这个算子需要完成什么业务 |
| void SetEventTrigger(int index) | 当这个事件被成功触发时,定义这个算子需要完成什么业务 |
| void SetEventError(int index) | 当这个事件发生错误时,定义这个算子需要完成什么业务 |
对不同类型数据操作
| 定义于头文件: < CommandServerNode > < Node > < T CPServerNode > < ThreadNode > | |
|---|---|
| const String * GetStringInput(int index) const std::vector< String> * GetStringInputList(int index) String * GetStringOutput(int index) std::vector< String> * GetStringOutputList(int index) |
对String类型的数据进行操作,包含获得输入/输出类型为 Input 或 OutPut 和InputList 或 Output 的 String 数据 |
| const Pose * GetPoseInput(int index) const std::vector< Pose > * GetPoseInputList(int index) Pose * GetPoseOutput(int index) std::vector< Pose> * GetPoseOutputList(int index) |
以 Pose 为操作类型数据 |
| const Image * GetImageInput(int index) const std::vector< Image > * GetImageInputList(int index) Image * GetImageOutput(int index) std::vector< Image > * GetImageOutputList(int index) |
以 Image 为操作类型数据 |
| const ImagePoints * GetImagePointsInput(int index) const std::vector< ImagePoints> * GetImagePointsInputList(int index) ImagePoints * GetImagePointsOutput(int index) std::vector< ImagePoints > * GetImagePointsOutputList(int index) |
以 ImagePoints 为操作类型数据 |
| const PointCloud * GetPointCloudInput(int index) const std::vector< PointCloud > * GetPointCloudInputList(int index) PointCloud * GetPointCloudOutput(int index) std::vector< PointCloud > * GetPointCloudOutputList(int index) |
以 PointCloud 为操作类型数据 |
| const Cube * GetCubeInput(int index) const std::vector< Cube > * GetCubeInputList(int index) Cube * GetCubeOutput(int index) std::vector< Cube > * GetCubeOutputList(int index) |
以 Cube 为操作类型数据 |
| const Cylinder * GetCylinderInput(int index) const std::vector< Cylinder > * GetCylinderInputList(int index) Cylinder * GetCylinderOutput(int index) std::vector< Cylinder > * GetCylinderOutputList(int index) |
以 Cylinder 为操作类型数据 |
| const JointArray * GetJointArrayInput(int index) const std::vector< JointArray > * Get JointArray InputList(int index) JointArray * Get JointArray Output(int index) std::vector< JointArray > * Get JointArray OutputList(int index) |
以 JointArray 为操作类型数据 |
CommandServerNode重写函数
| 定义于头文件: < CommandServerNode > | |
|---|---|
| virtual void ParameterChanged(const std::string& name) {} | 用于更改参数 |
| virtual bool ReceivedCommand(const std::string & command, const std::string & message) { return true; } | CommandServerNode中将命令的接受和返回分为了两个函数,在这里主要进行信息的接受处理 |
| virtual std::string AcknowledgeCommand(const std::string & command) { return ""; } | 在这个函数中进行命令的返回处理 |
TCPServerNode重写函数
| 定义于头文件: < TCPServerNode > | |
|---|---|
| virtual void ParameterChanged(const std::string& name) {} | 用于更改参数 |
| virtual std::string ProcessInputMessage(const std::string& message) { return "OK"; } | TCPServerNode中对于信息Message的主要处理在这个函数中实现 |
Node重写函数
| 定义于头文件: < TCPServerNode > | |
|---|---|
| virtual void ParameterChanged(const std::string& name) {} | 用于更改参数 |
| virtual int Process() {return 0; } | Node的主要业务处理在这个函数中实现 |
ThreadNode重写函数
| 定义于头文件: < ThreadNode > | |
|---|---|
| virtual void ParameterChanged(const std::string& name) {} | 用于更改参数 |
| virtual void ThreadInit() { return; } | 初始化线程,在线程开始时调用 |
| virtual bool BeforeProcess() { return true; } | 在线程处理前,应将Node中的数据拷贝到子线程中,如果返回False,则线程不会开始 |
| virtual int ThreadProcess() { return -1; } | 子线程中的主要处理函数在这里进行,这个线程不会进行sleep或wait,如果需要,应该在这里定义 |
| virtual void ThreadFinish() { return; } | 在这个函数中会结束子线程 |
| virtual bool AfterProcess() { return true; } | 在线程结束后,应将线程中的数据拷贝到Node中,如果返回False则Node会触发failed信号 |
3D 功能函数
| 定义于头文件: |
|
|---|---|
| void RVS_EXPORTS CloudCentroid(const PointCloud& cloud, Pose& centroid_pose) | 用于输出点云的 pose 中心 |
| int RVS_EXPORTS RemoveNaN(const PointCloud& in_cloud, PointCloud& out_cloud) | 用于去除 NAN(不是数)值 |
| bool RVS_EXPORTS EstimateNormal(const PointCloud& in_cloud,const double& search_radius, const bool& flip_normals,PointCloud& out_cloud) | 求出点云相应的法向量 |
| void RVS_EXPORTS RadiusOutlierRemoval(const PointCloud& in_cloud,const double& search_radius, const int& min_neighbors,PointCloud& out_cloud) | 用于半径滤波,对点云中的每一个点确定一个半径的邻域,若邻域范围内点数 < min_neighbors ,则认为该点为噪声点,并剔除 |
| void RVS_EXPORTS CropboxSegment(const PointCloud& in_cloud, const Cube& cropbox,PointCloud& out_cloud, PointCloud& negative_out_cloud) | 裁剪框切割,根据输入的立方体区域对点云进行切割 |
| void RVS_EXPORTS TransformPointCloud(const PointCloud& in_cloud, const Pose & pose,PointCloud& out_cloud) | 用于点云空间变换 |
| bool RVS_EXPORTS PlaneSegmentation(const PointCloud &in_cloud, const Pose &plane_pose,const std::string& seg_mode,const double& seg_distance_threshold,const bool& negative,PointCloud &out_cloud) | 用于平面点云切割。可以选取切割平面或者平面上/下的点云 |
| void RVS_EXPORTS PassThroughSegment(const PointCloud& in_cloud,const std::string& field_name,const double& min, const double& max,const bool& inside,PointCloud& out_cloud) | 用于切割坐标某个方向上一定范围的点云 |
| void RVS_EXPORTS DiffSegment(const PointCloud& input_cloud,const PointCloud& target_cloud,const double& distance_threshold,PointCloud& diff_cloud) | 用于输入两个点云,切割两个点云中不同的部分 |
| void RVS_EXPORTS NNPDSegment(const PointCloud &source_cloud, const PointCloud &target_cloud,const float& distance_threshold,PointCloud &remaining_cloud) | 用于输入两个点云中,保留源点云在目标点云中缺失的部分 |
| void RVS_EXPORTS ClusterExtraction(const PointCloud& in_cloud,const int& min, const int& max, const double& tolerance,std::vector< std::vector |
根据设定的最小距离参数 tolerance,将彼此间距超过该距离的两个目标点归为两类,间距小于该距离的点云归为一类,最终将多个目标点云彼此分开 |
| void RVS_EXPORTS ClusterExtraction(const PointCloud& in_cloud,const int& min, const int& max, const double& tolerance,std::vector |
同上 |
| bool RVS_EXPORTS FindPlane(const PointCloud& in_cloud,const int& max_iteration, const double& threshold,const double& percentage_threshold, const int& min_points,Pose& plane_pose, PointCloud& out_cloud) | 查找平面 |
| bool RVS_EXPORTS FindCylinder(const PointCloud& in_cloud,const int& max_iteration, const double& dist_thresh,const double& max_radius, const double& cylinder_length,Pose& cylinder_pose, Cylinder& cylinder, PointCloud& out_cloud) | 查找圆柱体 |
| bool RVS_EXPORTS FindSphere(const PointCloud& in_cloud,const int& max_iteration, const double& distance_threshold,const double& perc_thresh, const double& radius_min, const double& radius_max,Pose& sphere_pose, Sphere& sphere, PointCloud& out_cloud) | 查找球体 |
| bool RVS_EXPORTS FindCircle(const PointCloud& in_cloud,const int& max_iteration, const double& distance_threshold,Pose& circle_pose, Circle& circle, PointCloud& out_cloud) | 查找圆 |
| bool RVS_EXPORTS FindLine(const PointCloud& in_cloud,const int& max_iteration, const double& distance_threshold, const double& length,Line& line, PointCloud& out_cloud) | 查找线段 |
| void RVS_EXPORTS DownSample(const PointCloud& in_cloud,const double& leaf_x, const double& leaf_y, const double& leaf_z,PointCloud& out_cloud) | 降采样,数据点结果分布较为均匀 |
| void RVS_EXPORTS UniformSample(const PointCloud& in_cloud,const float& sampling_size,PointCloud& out_cloud) | 速度更快的降采样,但是数据点结果分布不均 |
| bool RVS_EXPORTS SimpleMVBB(const PointCloud& in_cloud,Cube& box, Pose& box_pose) | 获取点云的最小立方体包围框,与 ApproxMVBB 功能类似。推荐使用 SimpleMVBB,运算速度更快 |
| bool RVS_EXPORTS ApproxMVBB(const PointCloud& in_cloud,const int& num_of_sample_points,Cube& box, Pose& box_pose) | 获取点云的最小立方体包围框。本算子与 SimpleMVBB 算子功能一致 |
| bool RVS_EXPORTS HasNaN(const PointCloud& in_cloud) | 判断点云里是否含有NaN值 |
| void RVS_EXPORTS UseRefPose(const Pose& ref_pose, Cube& box, Pose& box_pose) | 根据输入的ref_pose计算得出最合适的pose,一般与获取点云的最小立方体包围框的算法结合使用 |
TCP通讯类算子以及编译
TCP通讯类算子的主要目的是,用于RVS软件同机器人或其他工控机程序之间的通讯。算子运行时会在RVS软件底层新建一个线程来创建并维持一个TCP Server端。
业务功能
RVS软件中提供了一个标准的TCP通讯模块。如下:
类似 HandEyeTCPServer ,将重新编写一个简单的 TCPTestServer,要求:
信号流中具备传输 ROBOT_TCP、ROBOT_JOINTS、MOVE_TCP字 符串功能
数据流中具备接收 TCP 和 JOINTS 数据,发送 TCP 数据的功能
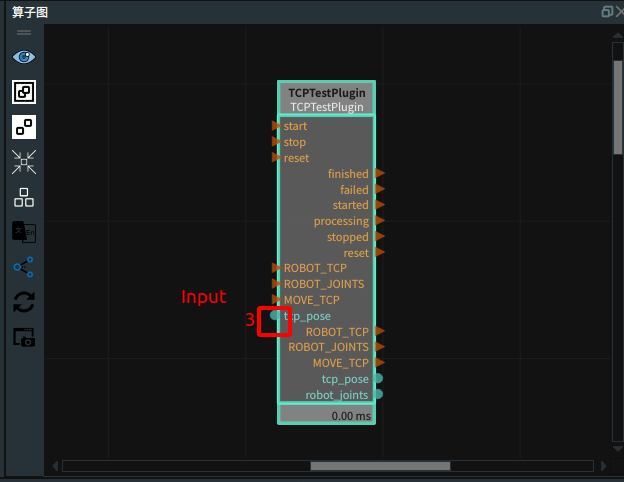
最后在RVS打开这个 Node 的效果应该如下:

代码解析
TCPTestPluginNode.h
需引入两个头文件,由于目标算子的类型是通讯类,在RVS中提供了相应的接口,此处只需引入 CommandServerNode.h 。同时希望算子工作时能正常记录 Log 日志,并显示在 UI 界面的 Log 显示区域中,此处也需引入 rvsLogging.h。
1.#include "rvs_plugin/CommandServerNode.h"
2.#include "rvs_plugin/rvsLogging.h"
定义派生类名称,注意要以 PluginNode 结尾,同时该类需要继承 rvs::CommandServerNode ,继承方式为 public ,在继承后将自动包含 start、stop、finished、reset 等基本通用信号流,二次开发的目的只需要将特定功能集成在算子当中,基础框架是无法进行更改的。
3.class TCPTestPluginNode : public rvs::CommandServerNode
4.{
5.private:
6.
包含构造函数和析构函数各一个,分别用于创建算子时初始化,和销毁这个算子时回收资源,名称应与派生类名称一致。
7.public:
8.    TCPTestPluginNode();
9.    ~TCPTestPluginNode();
10.
在接口中定义了两个虚函数等待重写,作用分别是 ReceivedCommand 接受指令,并拆分为数据流和信号流、AcknowledgeCommand 确认好指令后反馈给客户端,并告知已经接受到了数据。
11.protected:
12.    bool ReceivedCommand(const std::string &command , const std::string & message)override;
13.    std::string AcknowledgeCommand(const std::string &command) override;
14.};
TCPTestPluginNode.cpp
引入TCPTestPluginNode.h头文件
1.#include "TCPTestPluginNode.h"
构造方法内:RegisterCommand用于给算子添加信号流,如运行图所示,此处示例添加了ROBOT_TCP、ROBOT_JOINTS、MOVE_TCP 共 3 种信号流,同时请注意下方注释中的数字,其作为算子对应流的序号(从 0 开始),用于 GetPoseOutput()、GetJointArrayOutput() 等。GetXXXOutput()、GetXXXInput() 的参数,序号分为输入和输出流,不区分信号流和数据流,可对应运行图进行查看。
同时在这里使用了 RVS 的日志接口:RVS_PLUGIN_NODE_LOG(),括号内可以填入 fatal、error、warning、info、debug、trace状态,并在日志区域以不同的安全级别显示,此处填入warning,意味着当这个算子拖入时,在日志视图中会有一条黄色的日志抛出,并显示“tcp test server init success”提示算子生成成功。

2.TCPTestPluginNode::TCPTestPluginNode() : rvs::CommandServerNode("TCPTestPluginNode")
3.{
4.    RegisterCommands({"ROBOT_TCP","ROBOT_JOINTS","MOVE_TCP"});// 0 ,1 ,2
5.    RegisterOutput("Pose","tcp_pose"); // 3
6.    RegisterOutput("JointArray","robot_joint"); // 4
7.    RegisterInput("Pose","tcp_pose"); // 3
8.    RVS_PLUGIN_NODE_LOG(warning, "tcp test server init success", "tcp test server 初始化成功");
9.}
10.
11.TCPTestPluginNode::~TCPTestPluginNode()
12.{
13.}
ReceivedCommand 方法用于算子接收到客户端传输的数据后根据对应的命令执行操作,并将数据拆分为信号流和数据流传递给其他Node,方法参数 command为接收到的命令,message 为接收到除命令外的信息, 此处通过GetPoseOutput(3)绑定了运行途中右侧第4位输出流TCP_POSE(索引为3),调用 rvs_math 中关于pose的库(由于 CommandServerNode.h 中调用了 rvs_math/Pose.h,不需要重复调用)中的方法 FromString() ,它会将所接受到的信息转换为 Pose 类型。
同时在这里也使用了RVS的日志接口:RVS_PLUGIN_NODE_LOG(),此处填入info,意味着当这个算子接收到 command 时,会在日志视图中一条普通颜色的日志抛出,并显示对应消息内容。
14.bool TCPTestPluginNode::ReceivedCommand(const std::string & command, const std::string & message)
15.{
16.    if(command == "ROBOT_TCP")
17.    {
18.        RVS_PLUGIN_NODE_LOG(info) <<"Rec > tcp_pose";
19.        Pose *tcp_pose = GetPoseOutput(3);
20.        if(tcp_pose->FromString(message))
21.        {
22.            RVS_PLUGIN_NODE_LOG(info, "Rec > ROBOT_TCP : " << *tcp_pose, "Rec > ROBOT_TCP : " << *tcp_pose);
23.            return true;
24.        }
25.        return false;
26.    }
27.    else if(command == "ROBOT_JOINTS")
28.    {
29.        RVS_PLUGIN_NODE_LOG(info, "Rec > robot_joints", "Rec > robot_joints");
30.        JointArray *tcp_joints = GetJointArrayOutput(4);
31.        if(tcp_joints->FromString(message))
32.        {
33.            RVS_PLUGIN_NODE_LOG(info, "Rec > ROBOT_JOINTS : " << *tcp_joints, "Rec > ROBOT_JOINTS : " << *tcp_joints);
34.            return true;
35.        }
36.        return false;
37.    }
38.    else if(command == "MOVE_TCP")
39.    {
40.        RVS_PLUGIN_NODE_LOG(info, "Rec > MOVE_TCP ", "Rec > MOVE_TCP ");
41.        return true;
42.    }
43.    else
44.        return false;
45.}
AcknowledgeCommand 方法用于向客户端传输数据,其返回值为传递给对方的数据。
注解
MOVE_TCP 命令通过 GetPoseInput(3) 绑定了左侧输入数据流 tcp_pose,可以通过前置算子传递数据至本算子,并最后发送给服务端。
注解
在此处为了展示多样性,将 RVS_PLUGIN_NODE_LOG() 替换成了std::cout 语句,这意味着当使用终端打开 RVS 软件时,将会有信息在终端中显示部分信息,请根据自己的需求考虑使用哪种 Log 方式。
46.std::string TCPTestPluginNode::AcknowledgeCommand(const std::string &command)
47.{
48.    std::string ack_str;
49.    if(command == "ROBOT_TCP")
50.    {
51.        ack_str = "ROBOT_TCP";
52.        std::cout << "Ack > " <<ack_str <<std::endl;
53.        return ack_str;
54.    }
55.    else if (command == "ROBOT_JOINTS")
56.    {
57.        ack_str = "ROBOT_JOINTS";
58.        std::cout << "Ack > " << ack_str << std::endl;
59.        return ack_str;
60.    }
61.    else if(command == "MOVE_TCP")
62.    {
63.        ack_str = "MOVE_TCP";
64.        const Pose *to_tcp = GetPoseInput(3);
65.        ack_str += to_tcp->PoseToStr();
66.        std::cout << "Ack > " << ack_str <<std::endl;
67.        return ack_str;
68.    }
69.    else
70.        return "";
71.}
代码编译
当根据上述步骤已经完成了代码编写后,还需要通过 RVS 的 docker 环境进行编译才能将算子成功拖入到算子图当中。具体操作流程如下:
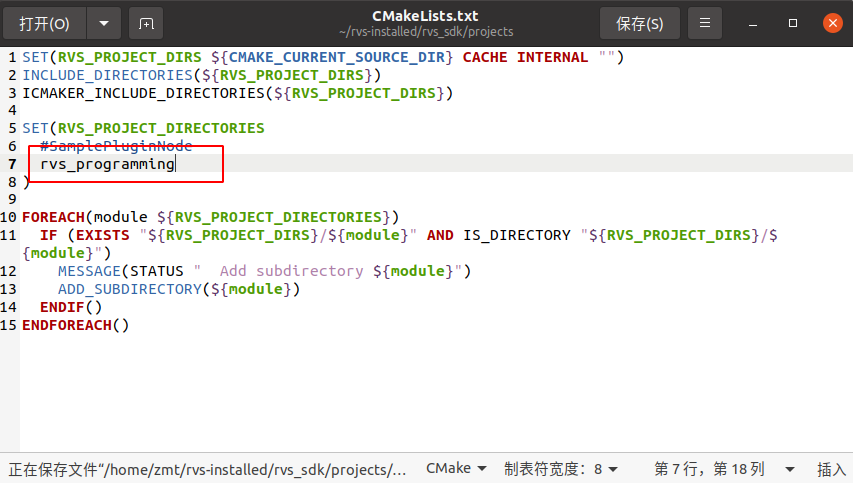
在安装目录的rvs_sdk/projects下,新建一个名为 rvs_programming 文件夹,并在 rvs_sdk/projects 下找到此处的 CMakeLists.txt ,填入要编译文件夹的名称 rvs_programming。
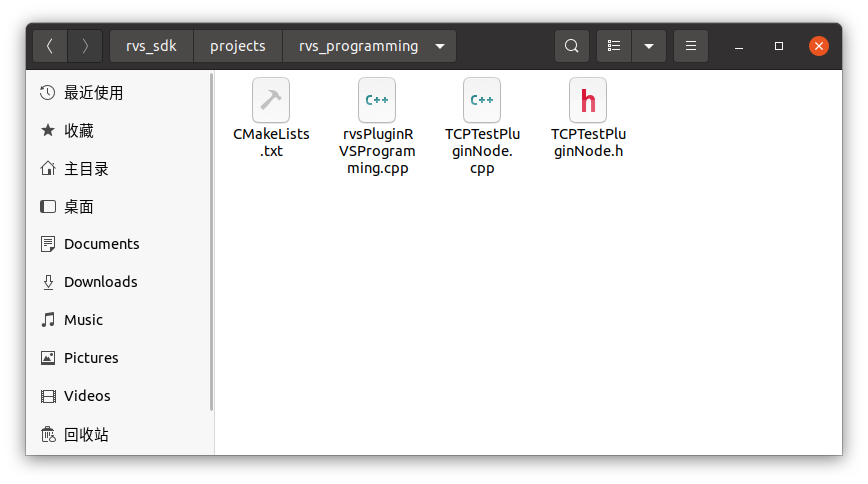
进入到 rvs_programming ,将写好的代码,放置到这个文件夹中,并且新创建两个文件,分别命名为 CMakeLists.txt 和rvsPluginRVSProgramming.cpp,这个文件夹的结构如下:
首先修改CMakeLists.txt中的内容,内容复制后修改即可。
注解
所有有关 RVS_PROGRAMMING 的文本内容,如果用户新建的文件夹命名不为 rvs_programming ,请根据需要进行替换,额外注意大小写。
1.SET(RVS_PROGRAMMING_PLUGIN_NODE_IDE_FOLDER "RVSProgrammingPluginNode")
2.SET(RVS_ PROGRAMMING _PLUGIN_NODE_HEADER_SUBDIR "RVSProgrammingPluginNode")
3.SET(RVS_ PROGRAMMING _PLUGIN_NODE_INCLUDE_DIRS
4.  ${CMAKE_CURRENT_SOURCE_DIR}
5.  ${RVS_INCLUDE_DIRS}
6.  CACHE INTERNAL "")
7.
8.# ============================================================ #
9.# Library rvs_plugin_rvs_programming
10.# ============================================================ #
11.ICMAKER_SET("rvs_plugin_rvs_programming" IDE_FOLDER ${RVS_ PROGRAMMING _PLUGIN_NODE_IDE_FOLDER})
在此处添加Source的cpp文件
12.ICMAKER_ADD_SOURCES(
13.  rvsPluginRVSProgramming.cpp
14.  )
在此处添加Node的cpp文件
15.ICMAKER_ADD_NODES(
16.  TCPTestPluginNode.cpp
17.  )
18.
19.ICMAKER_ADD_HEADERS(
20.  )
21.
22.ICMAKER_LOCAL_CPPDEFINES(-std=c++14)
23.ICMAKER_LOCAL_CPPDEFINES(-fPIC)
24.ICMAKER_LOCAL_CPPDEFINES(-DBOOST_LOG_DYN_LINK -Wno-deprecated)
25.ICMAKER_GLOBAL_CPPDEFINES()
26.ICMAKER_INCLUDE_DIRECTORIES(${RVS_ PROGRAMMING _PLUGIN_NODE_INCLUDE_DIRS})
27.
28.ICMAKER_DEPENDENCIES(
29.  EXPORT
30.  rvs_plugin
31.  Eigen
32.  OpenCV
33.  pcl
34.  Tycam
35.  )
36.
37.ICMAKER_BUILD_LIBRARY()
38.ICMAKER_INSTALL_HEADERS(${RVS_ PROGRAMMING _PLUGIN_NODE_HEADER_SUBDIR})
然后再修改 resource 文件,打开 rvsPluginRVS PROGRAMMING.cpp。
1.#include <iostream>
2.#include "rvs_kernel/rvsPluginClass.h"
3.#include "rvs_plugin/rvsLogging.h"
在此处添加 Node 的头文件
4.#include "TCPTestPluginNode.h"
5.// ===== Factory Function - Plugin EntryPoint ==== //
6.
7.RVS_PLUGIN_EXPORT_C
8.auto GetPluginFactory() -> rvsPluginBase*
9.{
10.  static rvsPluginFactory pinfo = []{
11.    auto p = rvsPluginFactory("rvsPluginRVSProgramming", "rvs-1.0.5");
在此处注册相应的 Node
12.  p.RegisterNode<TCPTestPluginNode>("TCPTestPluginNode");
13.    return p;
14.  }();
15.  return &pinfo;
16.}
17.
18.struct _DLLInit{
19.  _DLLInit(){
20.    RVS_PLUGIN_NODE_LOG(info, "Shared library rvsPluginRVSProgramming loaded OK.", "Shared library rvsPluginRVSProgramming loaded OK.");
21.  }
22.  ~_DLLInit(){
23.    RVS_PLUGIN_NODE_LOG(info, "Shared library rvsPluginRVSProgramming unloaded OK.", "Shared library rvsPluginRVSProgramming unloaded OK.");
24.  }
25.} dll_init;
当已经编写好 CMakeLists.txt 和 rvsPluginRVSProgramming.cpp 后,如果在之前没有编译过RVS算子,则需要手动进入 rvs_sdk 目录下创建空的 build 文件夹用于编译。
现在让进入 docker 编译环境。
在终端中进入 rvs 安装目录下的 script 路径,分别输入。
./docker_run.sh
./docker_exec.sh
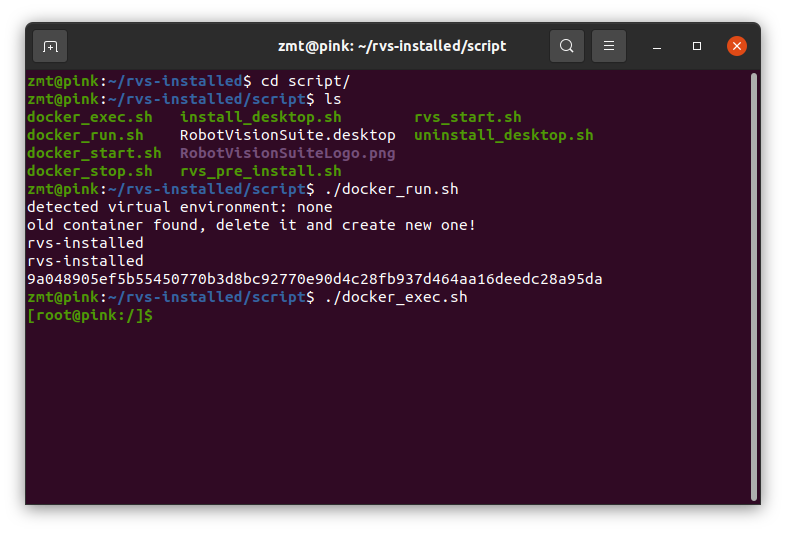
在docker的环境中进入rvs/rvs_sdk/build路径,分别输入:
cmake ..
make
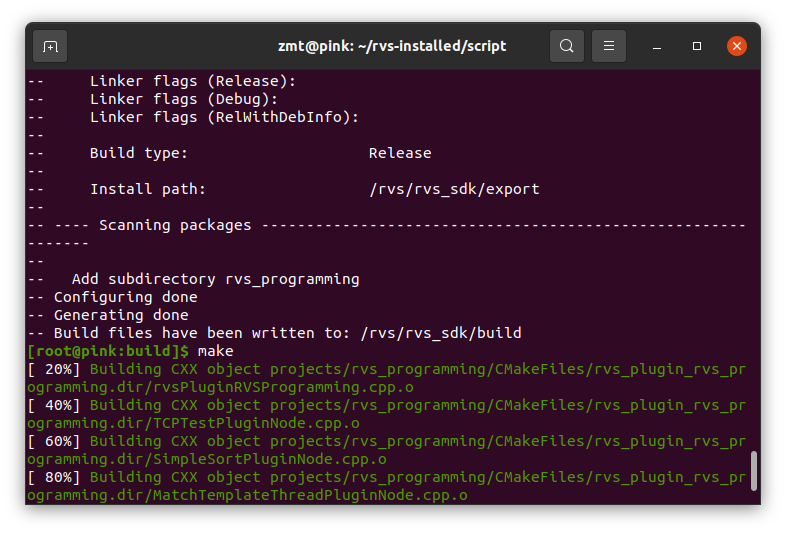
至此,已经完成算子的编译过程,需要用户重新打开 RVS 软件即可在算子列表中输入名称搜索到该算子。
代码测试
当已经完成了二次开发代码的编写及编译,现在可以进入到 RVS 软件当中测试新写的算子。
请根据下图,完整的连接出一个TCP本地通讯模组。
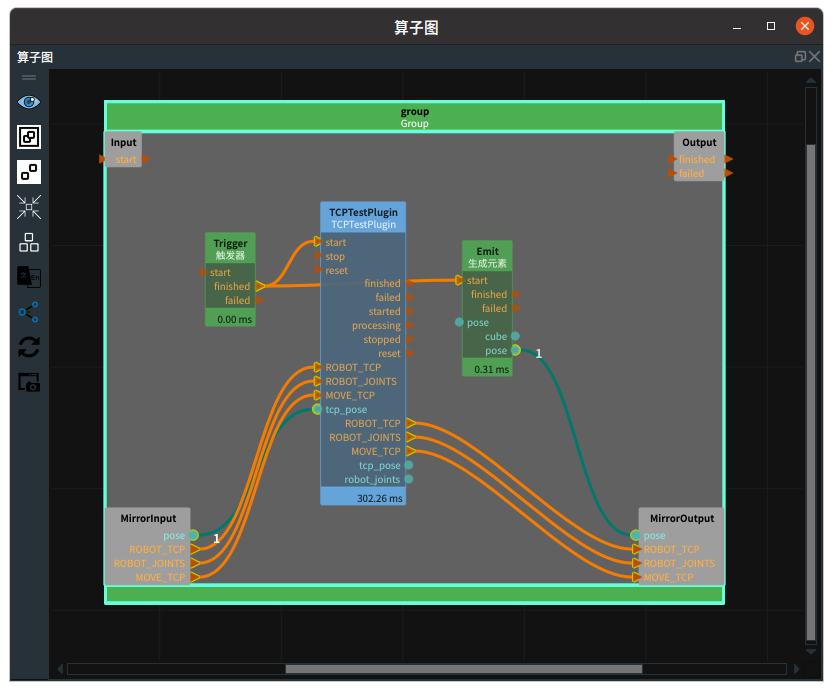
对于TCPTestPlugin算子参数无需任何改动,默认即可.Emit-Cube中在 pose 参数中,随意填写即可,本案例中填写的均为1,这意味着当发送MOVE_TCP将会收到 1 1 1 1 1 1的数据。
注解
在算子图中生成 TCPTestPlugin 时日志日图中是否有如下提示。

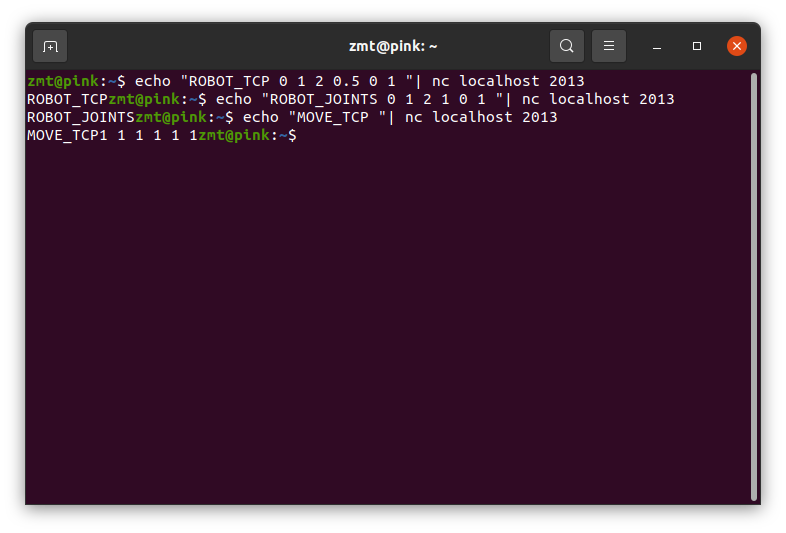
当程序启动后,打开终端在本地进行通讯测试(x代表随意填入的数值,注意引号内结尾前的空格):
echo “ROBOT_TCP x x x x x x ” | nc localhost 2013
echo “ROBOT_JOINTS x x x x x x ” | nc localhost 2013
echo “MOVE_TCP ” | nc localhost 2013
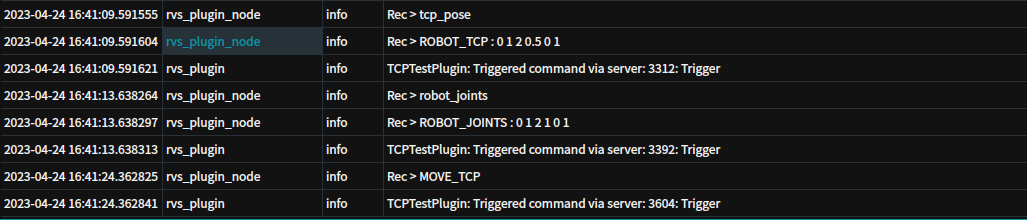
 在终端中接收的信息,和代码中预期是一致的。
同时也可以在RVS中观察命令是否被正确拆分,先点击 TCPTestPlugin ,鼠标分别移动到数据流 tcp_pose、robot_joints、tcp_pose 上,会出现一个蓝色的提示框,观察其中的数值是否和终端输入的一致,也可以在日志视图中查看 info 级别的 Log 。
功能类算子
编写功能类算子的主要目的是,创建在RVS软件中完成一个特定功能或解决一系列特殊问题的算子。这个算子是依托于RVS的主线程内进行运算的。
业务功能
RVS软件中提供了非常多的功能类算子。如下:
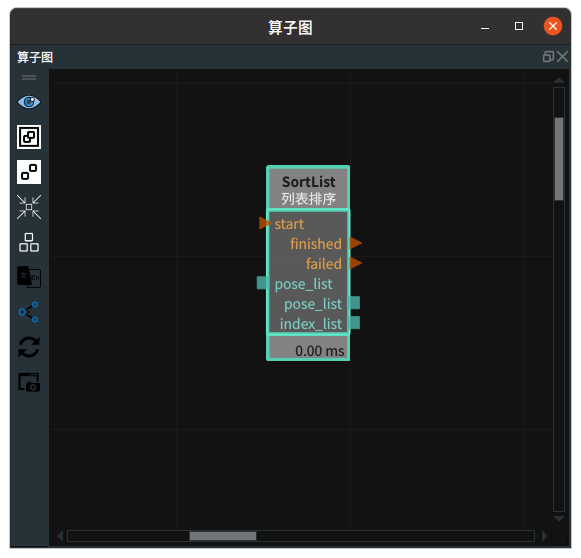
类似 SortList,将重新编写一个简单的 SimpleSortPlugin,要求:
由于只是简单的排序演示,本案例设定只对 xy 方向进行排序
既可以设定 xy 的排序的优先顺序,又可以分别设定 xy 两个方向增序降序模式
设置 x 和 y 的误差精度,当 x 的差值小于设定值时,认为他们的 x 是相同的
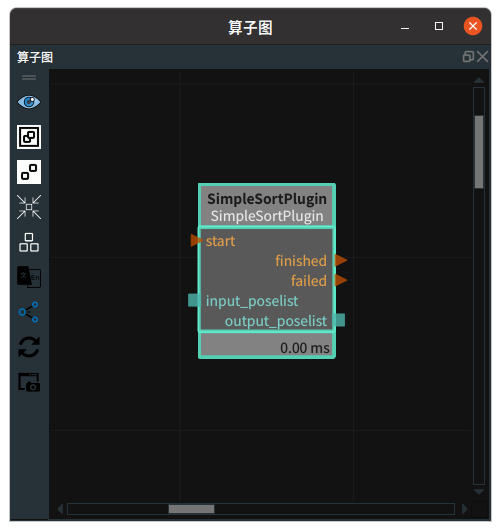
最后在RVS打开这个Node的效果应该如下:
代码解析
SimpleSortPluginNode.h
需引入两个头文件,由于目标算子的类型是普通功能类的算子,在RVS中提供了相应的接口,此处需引入Node.h。同时也希望算子工作时能正常记录 Log日志,同样的此处也需引入 rvsLogging.h。对于算子的实现过程,在 Node.h 中给出了虚函数 Process() 等待重写。其余内容与 TCPTestPluginNode.h 基本一致,不再赘述。
1.#include "rvs_plugin/Node.h"
2.#include "rvs_plugin/rvsLogging.h"
3.class SimpleSortPluginNode : public rvs::Node
4.{
5.public:
6.  SimpleSortPluginNode();
7.  ~SimpleSortPluginNode();
8.
9.protected:
10.  virtual int Process() override;
11.
在这里,设置一些参数,有些将会被用于算子属性面板上的暴露,具体实现在cpp中,同时声明一个比较方法用于排序。
12.private:
13.  float x_dif_range;
14.  float y_dif_range;
15.  std::vector<std::string> m_sort_mode_name_list;
16.  std::string m_sort_mode_name;
17.  std::vector<std::string> m_sort_mode_list;
18.  std::string m_sort_mode;
19.  std::string m_sort_x_mode;
20.  std::string m_sort_y_mode;
21.  bool Compare(const Pose & pose1, const Pose & pose2);
22.};
SimpleSortPluginNode.cpp
首先还是引入 SimpleSortPluginNode.h 头文件。
1.#include "SimpleSortPluginNode.h"
构造方法内:使用 AppendEnumParameter() 方法为算子属性面板中设置一个下拉框,这个方法是 Node.h 中提供的标准接口,括号内的参数分别为下拉框内的选项、这个下拉框的名称、确认后赋值对象、初始默认值,因此就需要在在 AppendEnumParameter() 前定义好下拉框所有选项的名称。使用AppendFloatParameter() 方法为算子属性面板中设置一个浮点参数输入框,同样这个方法也是 Node.h 中提供的标注接口,括号内的参数分别为输入框名称、复制对象、初始默认值。其余注册算子的输入输出与上文保持一致。
其中当注册 outputlist 时,会自动继承父类的属性,即会在属性面板上出现 visibility 和 scale 的参数设置。
2.SimpleSortPluginNode::SimpleSortPluginNode()
3.  :rvs::Node("SimpleSortPluginNode")
4.{
5.  // append parameter
6.  m_sort_mode_name_list={"xy","yx"};
7.  m_sort_mode_list={"Descending","Ascending"};
8.  AppendEnumParameter(m_sort_mode_name_list, "sort_mode", m_sort_mode_name,
9.                      m_sort_mode_name_list[0]);
10.  AppendEnumParameter(m_sort_mode_list,"sort_x_mode",m_sort_x_mode,m_sort_mode_list[0]);
11.  AppendEnumParameter(m_sort_mode_list,"sort_y_mode",m_sort_y_mode,m_sort_mode_list[0]);
12.  AppendFloatParameter("x_dif_range", x_dif_range, 0.1f);
13.  AppendFloatParameter("y_dif_range", y_dif_range, 0.1f);
14.
15.  // register input
16.  RegisterInputList("Pose","input_poselist");   // 0
17.
18.  // register output
19.  RegisterOutputList("Pose","output_poselist"); // 0
20.}
21.
22.SimpleSortPluginNode::~SimpleSortPluginNode(){}
23.
方法 Process() 可以被视作算子运行的主程序,当算子开始运行时,这部分编写的内容将会承担算子功能的主体,那么在这个过程中总共分为三大步骤:
获取前项算子传输过来的一系列 poselist 值,判断是否为空,若不为空则进行下一步,若为空值则应该抛出一个黄色的 Log 提示用户进行操作,这个过程还是通过 RVS_PLUGIN_NODE_LOG() 实现
按照要求进行排序,针对于这个要求将在 Comapre 函数中进行实现
将已经排序好的 poselist ,遍历赋值给 output (需要清空,避免多次结果累计堆叠),给下面的算子进行传输
24.int SimpleSortPluginNode::Process()
25.{
26.  // get input_poselist
27.  const PoseList* input_poselist = GetPoseInputList(0);
28.  if (input_poselist==NULL || input_poselist->empty())
29.  {
30.    RVS_PLUGIN_NODE_LOG(warning, "input_poselist is null or empty", "input_poselist 输入为空");
31.    return 0;
32.  }
33.  // sort
34.  std::vector<Pose> poselist = *input_poselist;
35.  std::sort(poselist.begin(),poselist.end(),[this](const Pose & p1, const Pose & p2) { return Compare(p1, p2); });
36.  // get out_poselist
37.  std::vector<Pose>* output_poselist = GetPoseOutputList(0);
38.  output_poselist->clear();
39.  for (unsigned int i = 0; i < poselist.size(); i++)
40.  {
41.    output_poselist->push_back(poselist[i]);
42.  }
43.  return 1;
44.}
45.
下面是排序方法Compare的主要实现,先对于xy的排序顺序先进行判断,再对于误差精度进行判断,最后再根据增降序进行总结:
46.bool SimpleSortPluginNode::Compare(const Pose & pose1, const Pose & pose2)
47.{
48.  if (m_sort_mode_name=="xy")
49.    {
50.      if (abs(pose1.x-pose2.x)<=x_dif_range)
51.        {
52.          if (m_sort_y_mode=="Ascending")
53.            return pose1.y < pose2.y;
54.          else
55.            return pose1.y > pose2.y;
56.        }
57.      else
58.        {
59.          if (m_sort_x_mode=="Ascending")
60.            return pose1.x < pose2.x;
61.          else
62.            return pose1.x > pose2.x;
63.        }
64.    }
65.  else if (m_sort_mode_name=="yx")
66.    {
67.      if (abs(pose1.y-pose2.y)<=y_dif_range)
68.        {
69.          if (m_sort_x_mode=="Ascending")
70.            return pose1.x < pose2.x;
71.          else
72.            return pose1.x > pose2.x;
73.        }
74.      else
75.        {
76.          if (m_sort_y_mode=="Ascending")
77.            return pose1.y < pose2.y;
78.          else
79.            return pose1.y > pose2.y;
80.        }
81.    }
82.  else
83.    {
84.      RVS_PLUGIN_NODE_LOG(warning, "m_sort_field_name: not supported", "sort_mode:不支持");
85.      return false;
86.    }
87.  return false;
88.}
代码编译
当根据上述步骤已经完成了代码编写后,请先将两个文件放入编译的目录下,后与 2.2.3 中代码编译内容相似,也需要通过 RVS 的 docker 环境进行编译才能将算子成功拖入到算子图当中,这时候仅需要对原有文件进行简单修改即可。
首先修改 rvs_sdk/projects/CMakeLists.txt 中的内容。
1.ICMAKER_ADD_NODES(
2.  TCPTestPluginNode.cpp
3.  SimpleSortPluginNode.cpp
4.  )
然后再修改相同路径下的 rvsPluginRVSProgramming.cpp 中的两处内容,第一处:
1.#include "rvs_plugin/rvsLogging.h"
2.#include "SimpleSortPluginNode.h"
第二处:
1. static rvsPluginFactory pinfo = []{
2.    auto p = rvsPluginFactory("rvsPluginRVSProgramming", "rvs-1.0.5");
3.    p.RegisterNode<SimpleSortPluginNode>("SimpleSortPluginNode");
4.    p.RegisterNode<TCPTestPluginNode>("TCPTestPluginNode");
5.    return p;
6.  }();
同样在 docker 的环境中进入 rvs/rvs_sdk/build 路径,分别输入:
cmake ..
make
至此,已经完成排序算子的编译过程,需要用户重新打开 RVS 软件即可在算子列表中输入名称搜索到该算子 。
代码测试
当已经完成了排序算子二次开发代码的编写及编译,现在可以进入到RVS软件当中测试新写的算子
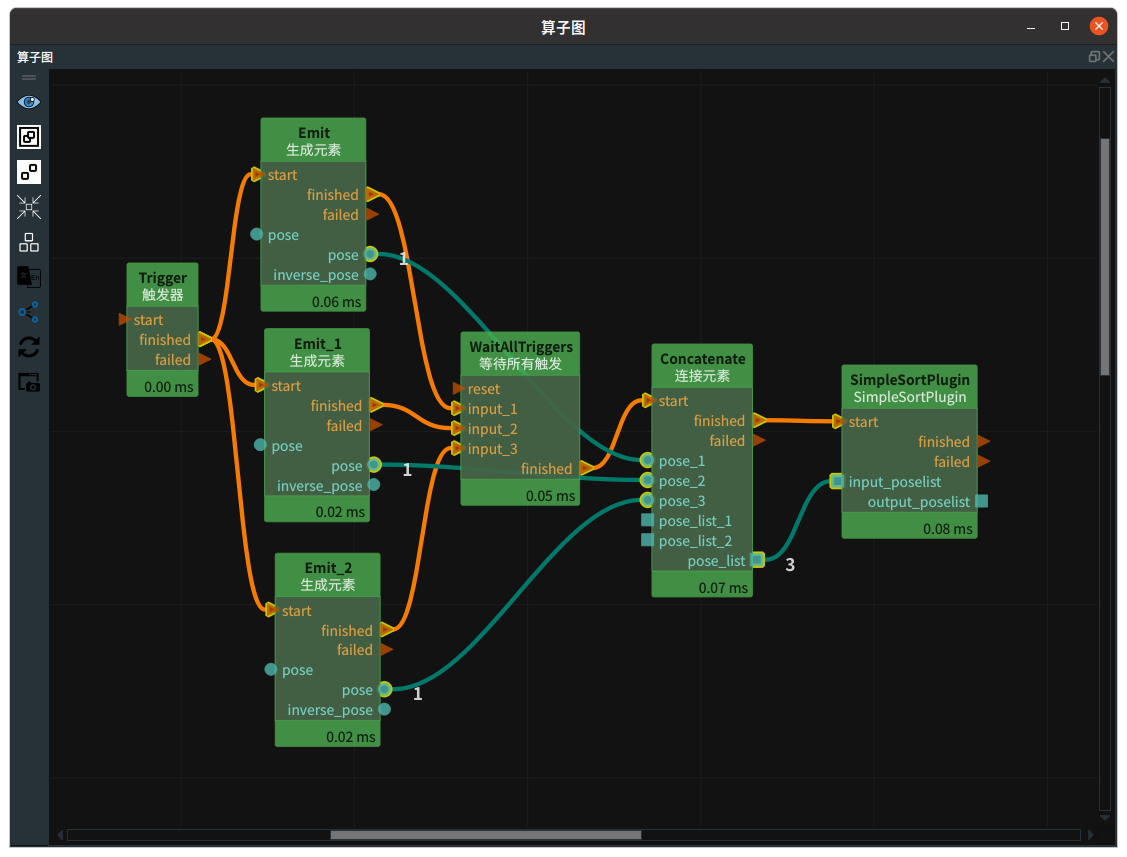
请根据下图,完整的连接出一个排序模组。
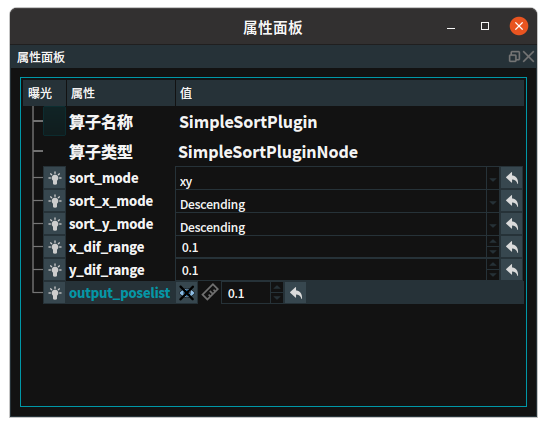
其中简单设置一下参数,对于 emitpose 只需设置 xy 即可,那么对于 emitpose、emitpose_1、emitpose_2 的 xy 分别设置(2,1)、(1,2)、(2,2);对于SimpleSortPlugin 算子,分别将参数设置为 xy、Descending、Descending、0.1、0.1。
点击ConcatenatePose,鼠标移动到pose_list上,在没有排序前顺序分别为: [0] 2 1 0 0 0 0 [1] 1 2 0 0 0 0 [2] 2 2 0 0 0 0
点击SimpleSortPlugin,鼠标移动到output_poselist上,在排序后顺序分别为: [0] 2 2 0 0 0 0 [1] 2 1 0 0 0 0 [2] 1 2 0 0 0 0
达到了预期的业务功能。
线程类算子
线程类算子的主要目的是,当一个普通算子要承担非常重要的计算任务时,它会花费大量的资源和时间,这样在它后面的算子就需要等到非常久才能正常运行,这时候就可以开辟一个新的子线程来使它在后台进行运算,不干扰主线程算子的计算来实现并行运算,加快工作节拍。与 TCP 通讯类算字不同的是,需要管理整个线程的初始化、加载、运算、以及回收工作。
业务功能
将编写一个简单的 MatchTemplateThread,要求:
能实现基本的 2D 图像模板匹配
能通过算子读取本地文件
最后在RVS打开这个 Node 的效果应该如下:

代码解析
MatchTemplateThreadPluginNode.h
需引入三个头文件,由于目标算子的类型是线程类的算子,在 RVS 中提供了相应的接口,此处需引入 ThreadNode.h ;同时也希望算子工作时能正常记录 Log 日志,同样的此处也需引入rvsLogging.h;此外,由于需要对 2D 图像进行操作,则需要引入 opencv.hpp 文件;余内容与上述内容 基本一致,不再赘述。
1.#include "rvs_plugin/ThreadNode.h"
2.#include "rvs_plugin/rvsLogging.h"
3.#include "opencv2/opencv.hpp"
4.class MatchTemplateThreadPluginNode : public rvs::ThreadNode
5.{
6.private:
7.
8.public:
9.    MatchTemplateThreadPluginNode();
10.    ~MatchTemplateThreadPluginNode();
11.
对于算子的线程管理过程,在 ThreadNode.h 中给出了一系列虚函数 ThreadInit()、ThreadFinish()、ThreadProcess()、BeforeThread()、AfterThread() 等待重写。
12.protected:
13.    void ThreadInit() override;
14.
15.    void ThreadFinish() override;
16.
17.    bool BeforeProcess() override;
18.
19.    int ThreadProcess() override;
20.
21.    bool AfterProcess() override;
22.private:
23.    std::string m_img;
24.    std::string m_template;
25.    cv::Mat m_input_image;
26.    cv::Mat m_input_template;
27.};
MatchTemplateThreadPluginNode.cpp
引入 MatchTemplateThreadPluginNode.cpp 头文件。在这里添加 FileParameter,为选择本地文件添加参数,这里注意括号内最后一个参数给的是空,默认不选择任何文件,需要手动选择。由于是图像的模板匹配,就要在输出时给出一个 Image 的输出。
1.#include "MatchTemplateThreadPluginNode.h"
2.
3.MatchTemplateThreadPluginNode::MatchTemplateThreadPluginNode() : rvs::ThreadNode("MatchTemplateThreadPluginNode")
4.{
5.    AppendFileParameter("Img",m_img,"Load Image (*.png *.bmp *.jpg *.tiff)","");
6.    AppendFileParameter("Template",m_template,"Load Image (*.png *.bmp *.jpg *.tiff)","");
7.    RegisterOutput("Image","result"); //0
8.    RVS_PLUGIN_NODE_LOG(warning, "MatchTemplateThreadPluginNode generate success", "MatchTemplateThreadPluginNode 添加成功");
9.}
10.
11.MatchTemplateThreadPluginNode::~MatchTemplateThreadPluginNode()
12.{
13.}
14.
ThreadInit() 的实现方法,在这里只是简单的提示线程在初始化,往往在做类似与 AI 训练和推理的时候,就需要在这个部分加载一些大文件进行缓存。
15.void MatchTemplateThreadPluginNode::ThreadInit()
16.{
17.    RVS_PLUGIN_NODE_LOG(debug, "MatchTemplateThreadPluginNode::ThreadInit()", "MatchTemplateThreadPluginNode::ThreadInit()");
18.}
19.
BeforeThread() 的实现方法,在这里主要完成对主线程传入的数据在子线程进行读取和加载,如果这里返回 false 那么子线程的 process 过程就不会进行。
20.bool MatchTemplateThreadPluginNode::BeforeProcess()
21.{
22.    RVS_PLUGIN_NODE_LOG(debug, "MatchTemplateThreadPluginNode::BeforeProcess()", "MatchTemplateThreadPluginNode::BeforeProcess()");
23.    m_input_image = cv::imread(m_img);
24.    m_input_template = cv::imread(m_template);
25.    return true;
26.}
27.
ThreadProcess() 的实现方法,在这里主要进行的就是算法的主要处理部分。
28.int MatchTemplateThreadPluginNode::ThreadProcess()
29.{
30.   RVS_PLUGIN_NODE_LOG(debug, "MatchTemplateThreadPluginNode::ThreadProcess()", "MatchTemplateThreadPluginNode::ThreadProcess()");
31.    int result_cols = m_input_image.cols - m_input_template.cols + 1;
32.    int result_rows = m_input_image.rows - m_input_template.rows + 1;
33.    cv::Mat img_result;
34.    img_result.create(result_cols,result_rows,CV_32FC1);
35.    cv::matchTemplate(m_input_image, m_input_template, img_result, cv::TM_SQDIFF_NORMED);
36.    cv::normalize(img_result, img_result, 0, 1, cv::NORM_MINMAX, -1, cv::Mat());
37.    double minVal = -1;
38.    double maxVal;
39.    cv::Point minLoc;
40.    cv::Point maxLoc;
41.    cv::Point matchLoc;
42.    cv::minMaxLoc(img_result, &minVal, &maxVal, &minLoc, &maxLoc, cv::Mat());
43.    matchLoc = minLoc;
44.    cv::Point center = cv::Point(minLoc.x + m_input_template.cols / 2, minLoc.y + m_input_template.rows / 2);
45.    cv::rectangle(m_input_image, matchLoc, cv::Point(matchLoc.x + m_input_template.cols, matchLoc.y + m_input_template.rows), cv::Scalar(0, 255, 0), 2, 8, 0);
46.    cv::circle(m_input_image, center, 2, cv::Scalar(255, 0, 0), 2);
47.    return 1;
48.}
49.
ThreadFinish()的方法实现,这里为空,不需要额外处理。
50.void MatchTemplateThreadPluginNode::ThreadFinish()
51.{
52.}
53.
AfterThread() 的方法实现,在这里将计算好的数据传给主线程中的参数,以 Image 的形式给到下一个算子,如果这里返回 false,那么整个算子回触发 failed 信号流。
54.bool MatchTemplateThreadPluginNode::AfterProcess()
55.{
56.    RVS_PLUGIN_NODE_LOG(debug, "MatchTemplateThreadPluginNode::AfterProcess()", "MatchTemplateThreadPluginNode::AfterProcess()");
57.    Image* m_result = GetImageOutput(0);
58.    *m_result=m_input_image;
59.    return true;
60.}
代码编写的过程已经结束,编译的过程与本章节中 2.2.3 相同,详情请参考。
代码测试
当已经完成了二次开发代码的编写及编译,现在可以进入到 RVS 软件当中测试新写的算子。
请根据下图,完整的连接出一个 MatchTemplateThreadPluginNode 本地测试模组。
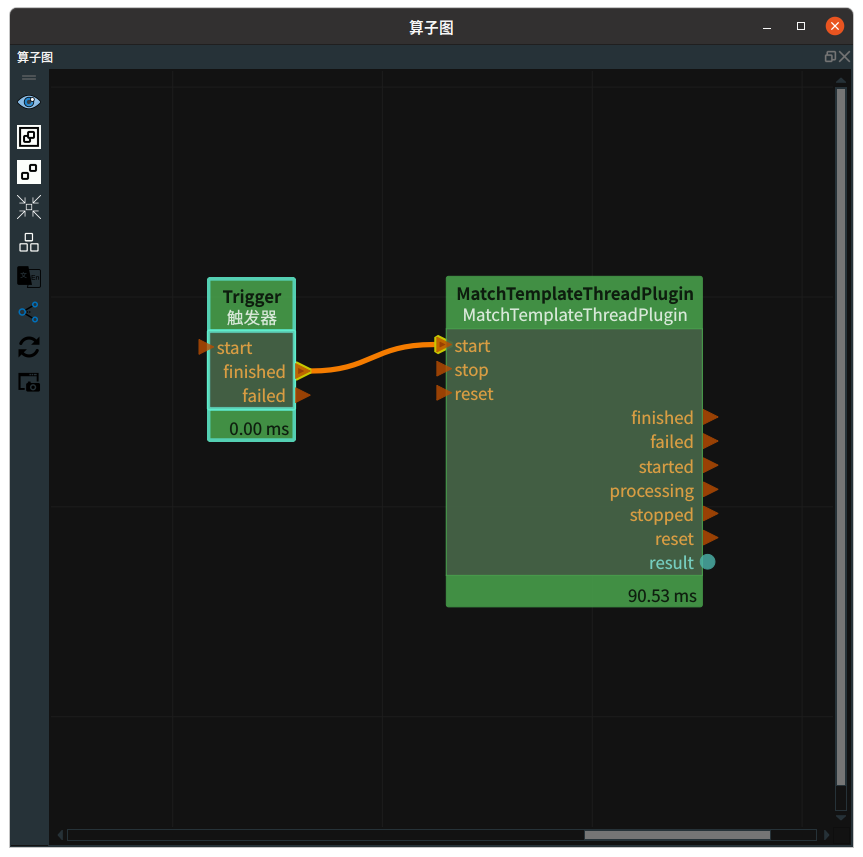
请点击编写的算子 MatchTemplateThreadPlugin ,在属性面板中在Img中选择一张本地的原图像,在 Template 中选择一张待测图像,并将 result_visibility 选为 true ,如下图:


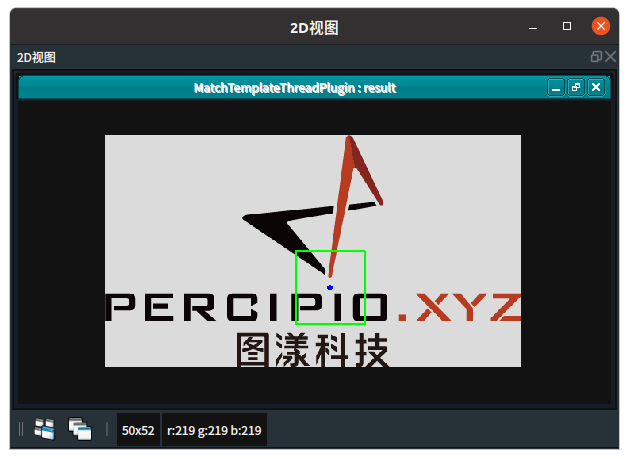
让整个程序开始运行,触发 Trigger ,在这个过程中与 TCP 通讯类和功能类算子不同,在计算时这个算子会以蓝色提示子线程正在运行,当计算完成后才会恢复绿色,代表子线程结束。在最后可以在 2d 显示区域可以看到算法的结果,代表算子运行成功。
Windows系统下的二次开发引导
在上述文档的基础上,Windows 版本 RVS 允许通过 Visual Studio 工程进行二次开发,其中 Visual Studio 版本不低于 VS2019,这也是推荐的 VS 版本(vc142),安装 RVS 后即可在安装路径下可以找到该工程,参见:
{RVS安装目录}\ rvs_sdk\RvsPluginNodeExample\RvsPluginNodeExample.sln
注解
该工程需在 Release x64 下编译 有关在 windows 下使用 Visual Studio 进行 RVS 二次开发算子的具体操作,参见该工程文件的 ReadMe.md 文档